Chromatic confocal measurement system and its experimental study based on inclined illumination
-
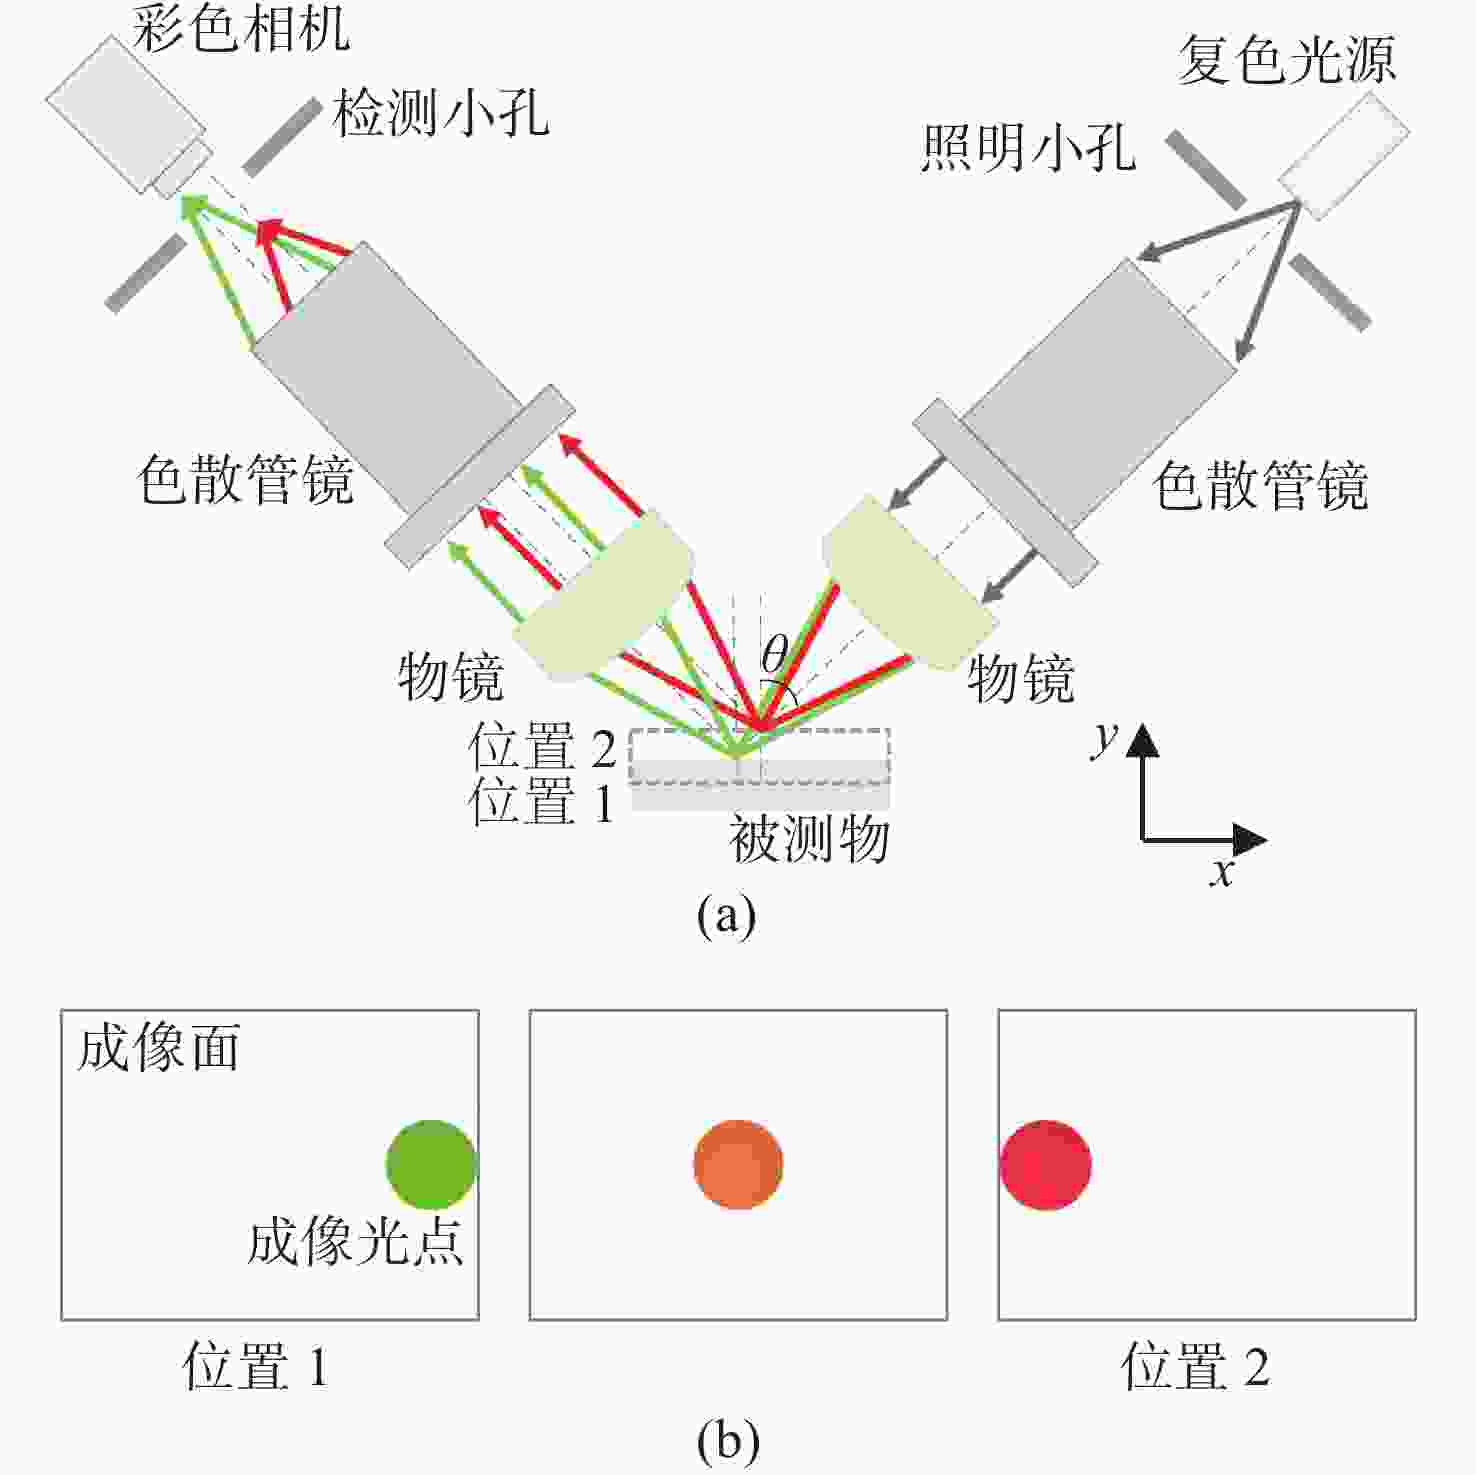
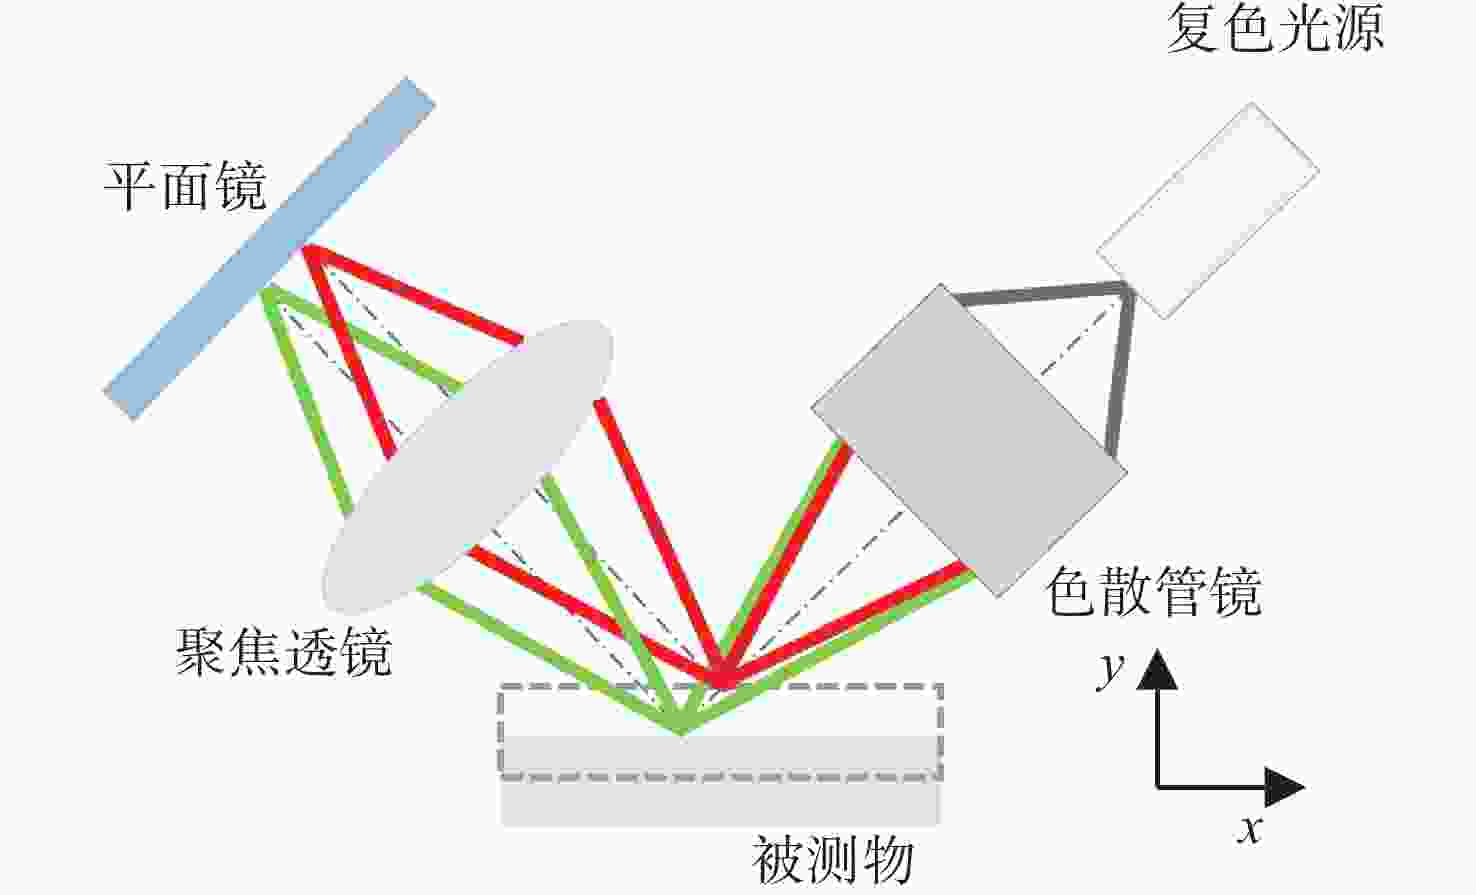
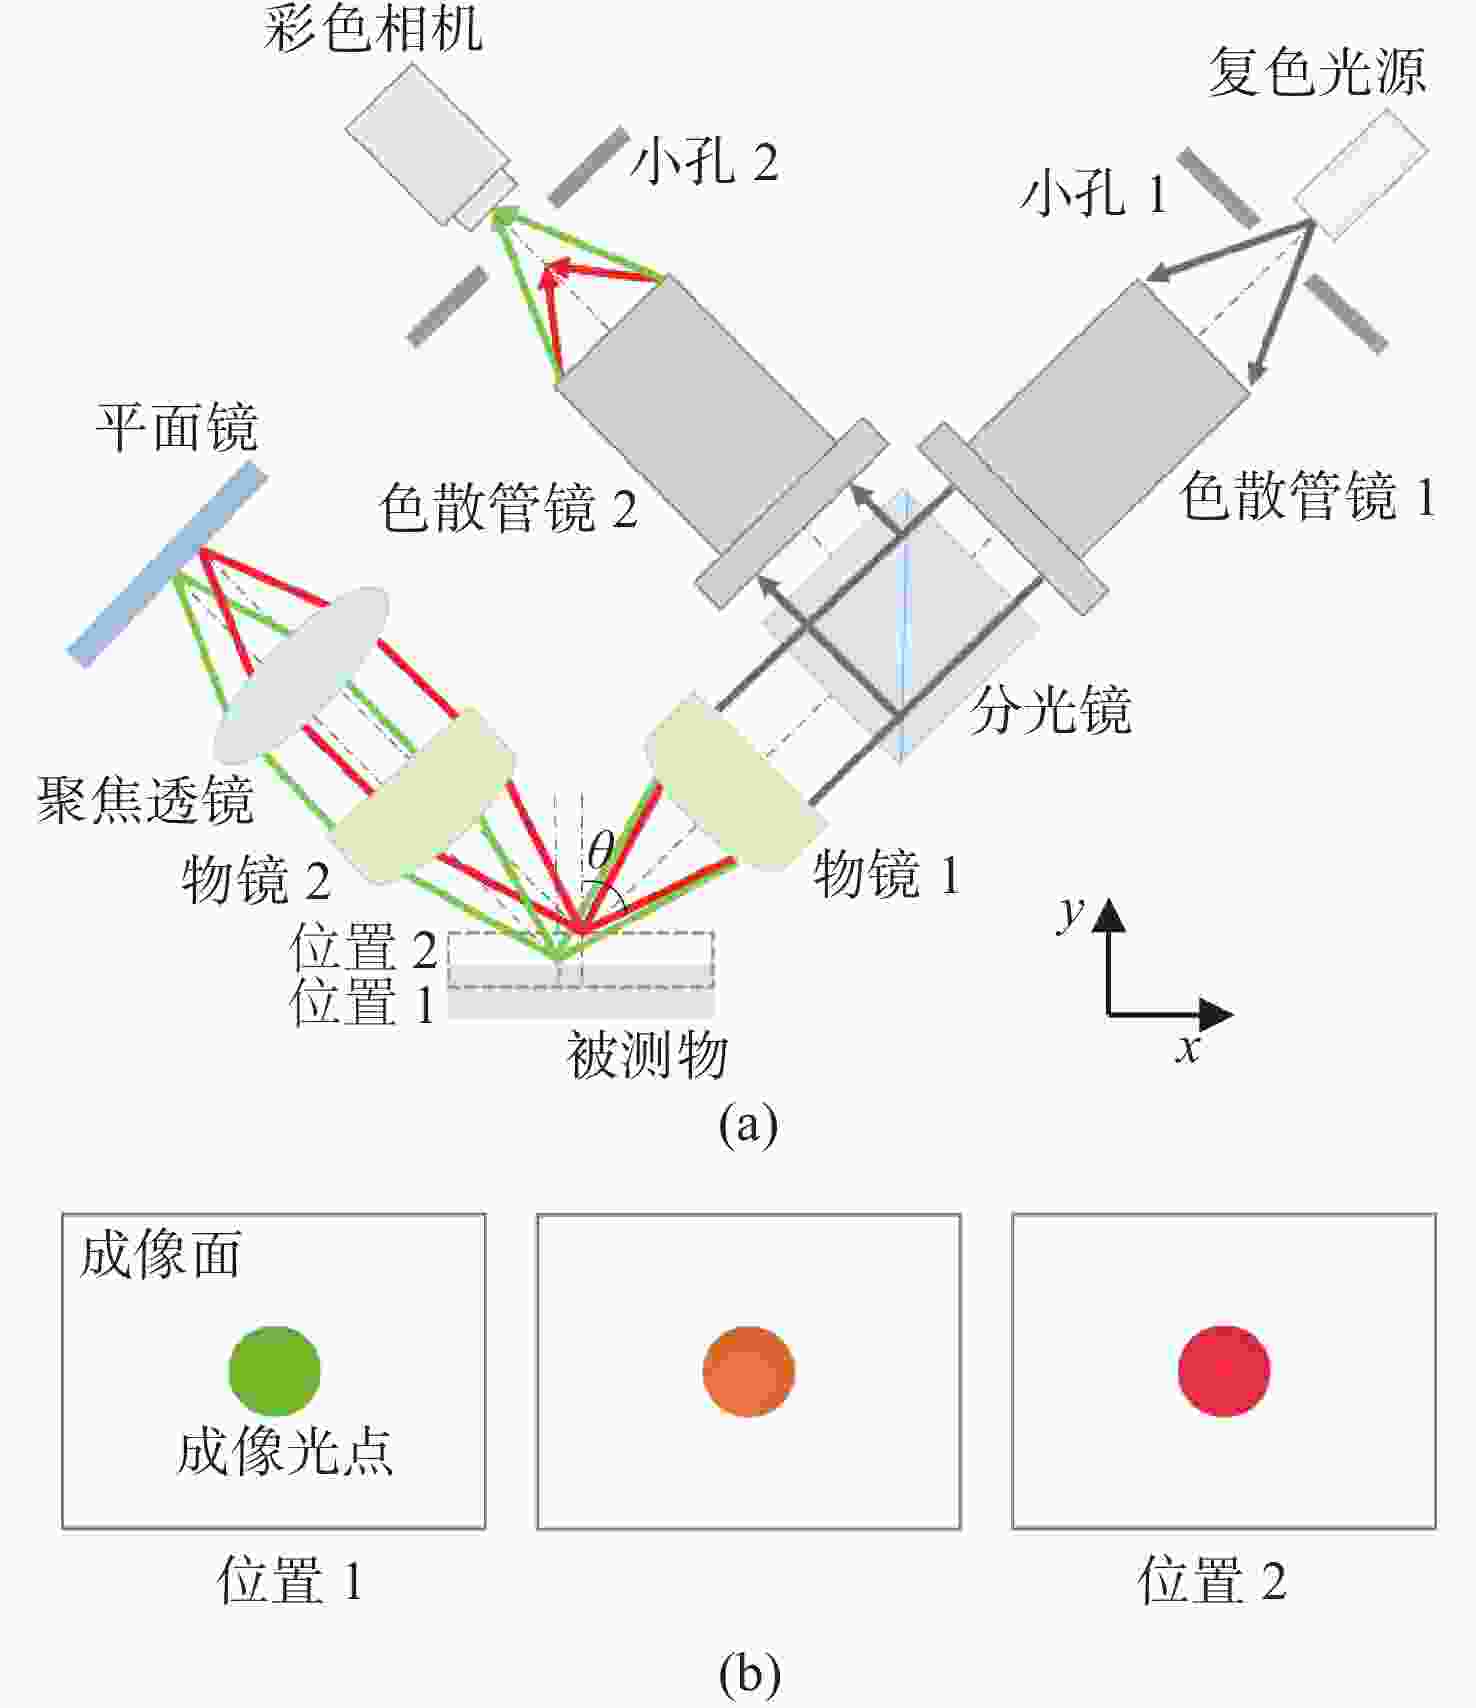
摘要: 彩色共聚焦测量技术因无需轴向扫描,测量精度和测量效率高等优点,被广泛应用于工业领域,如高度测量和透明材料厚度检测等。然而,常见的彩色共聚焦系统多为同轴照明结构,即照明光轴和成像光轴都垂直于被测试样,系统的信噪比和光能利用率大大降低。现有的斜照明系统成像面光点漂移量较大,测量精度和应用范围受限。为此,本文提出一种改进的斜照明式彩色共聚焦测量方法,将现有斜照明系统的“V字形”结构调整为“三轴结构”,通过增加调节支路限制光点的漂移;同时,利用面阵彩色相机作为光电接收器件,结合颜色转换算法通过光点颜色得到所需高度值。本文先进行标定实验确定本装置的测量范围及精度;再依次以自制台阶和透明材料作为测量对象,得到相应的被测值。同时,为了验证改进后的系统性能,在相同条件下利用“V字型”系统进行对比实验。实验结果表明,该系统的轴向测量范围为350 μm,重复性优于1.69,轴向测量精度可达到微米级,且该系统具有良好的透明材料厚度测量能力。通过对比试验可以验证,系统对于光点漂移具有良好的抑制效果,且抑制后系统的测量准确度有明显提升。Abstract: Because the chromatic confocal technique has no axial scanning, high measurement speed, high precision, good axial tomography ability, and good axial resolution ability, it is widely used in industrial fields such as height measurement and transparent specimen thickness measurement. However, most chromatic confocal systems are coaxial illumination structures in which the illumination optical axis and imaging optical axis are perpendicular to the tested specimen which reduces its signal-to-noise ratio and light energy utility. However, the existing inclined illumination system has high light spot drift on the imaging surface, and the measurement accuracy and application range are limited. To overcome the above shortcomings, a chromatic confocal measurement method with inclined illumination is proposed in this paper. The "V-shaped" structure is changed to a triaxial structure, and the drift of the light spot is limited by adding an adjusting branch. Also, an array color camera is used as the photoelectric receiving device, and the height value is obtained by the light spot’s color processed by a color conversion algorithm. In this study, the calibration experiment was first carried out to determine the measurement range and accuracy of the device. Then, the self-made steps and transparent specimens were measured and the corresponding measured values were determined. In order to better verify the performance of the improved system under unchanged conditions, the V-shaped system was used for comparison. The experimental results show that the axial measurement range of the system is 350 μm, and the repeatability is greater than 1.69 μm. The axial measurement accuracy can reach the micron level and the system is highly capable of measuring the thickness of transparent specimens. Through comparison, it can be verified that the system has a good suppression effect on spot drift, and the measurement accuracy of the system has been significantly improved after suppression.
-
Key words:
- chromatic confocal /
- inclined illumination /
- triaxial structure /
- transparent specimen
-
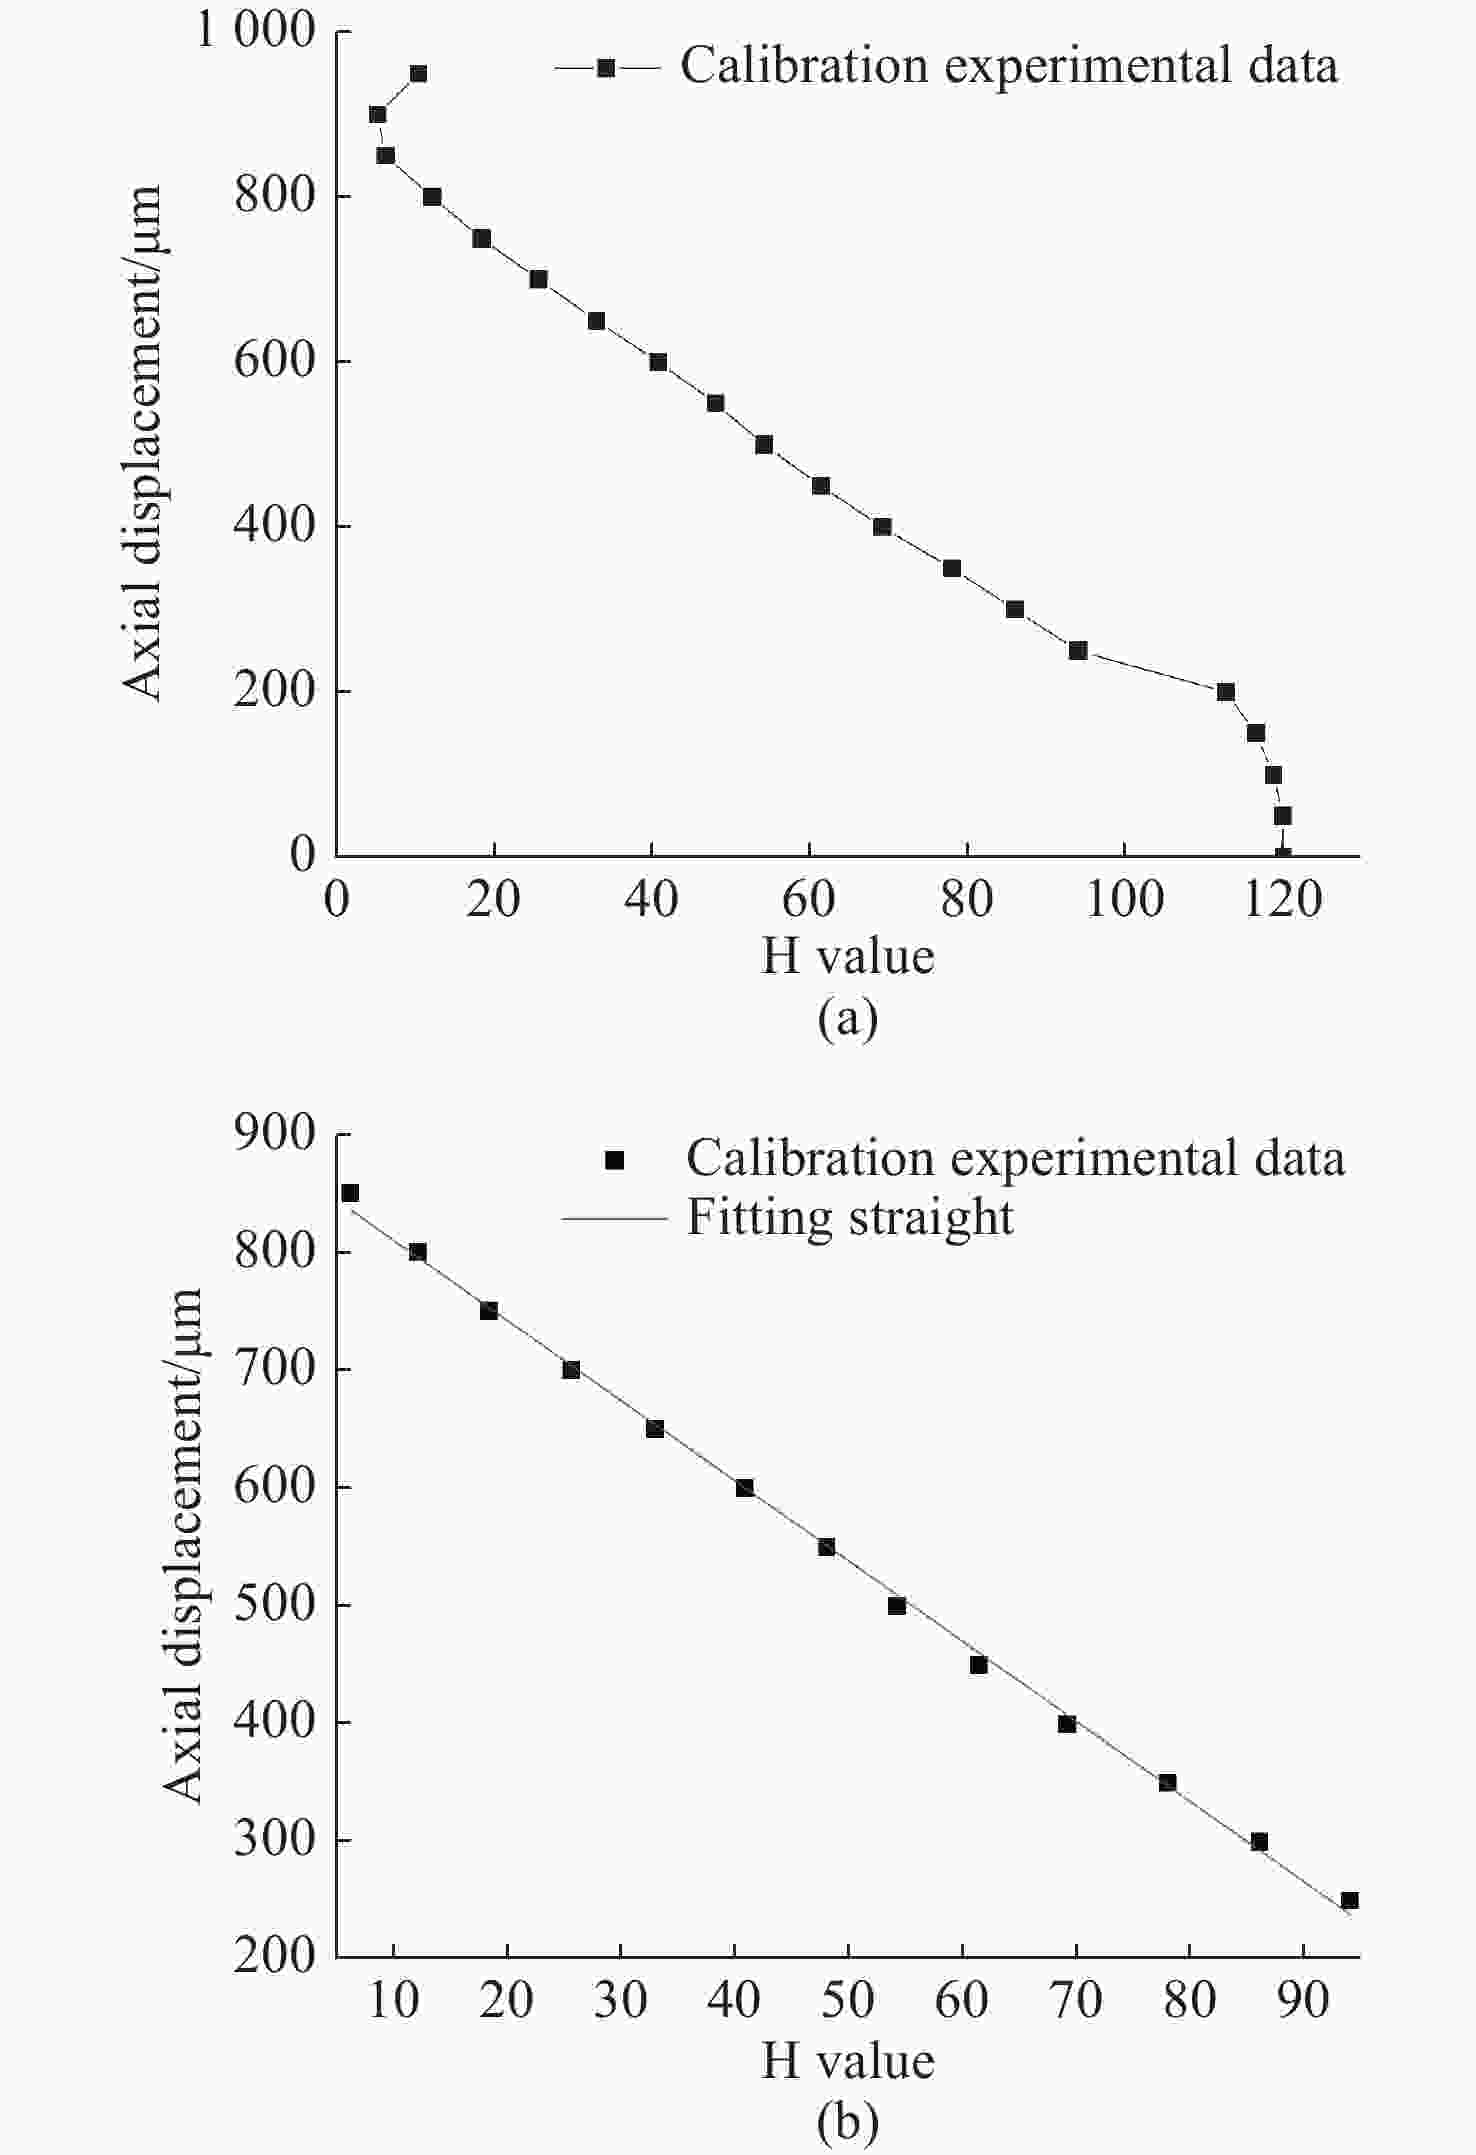
表 1 标定实验数据
Table 1. Calibration of experimental data
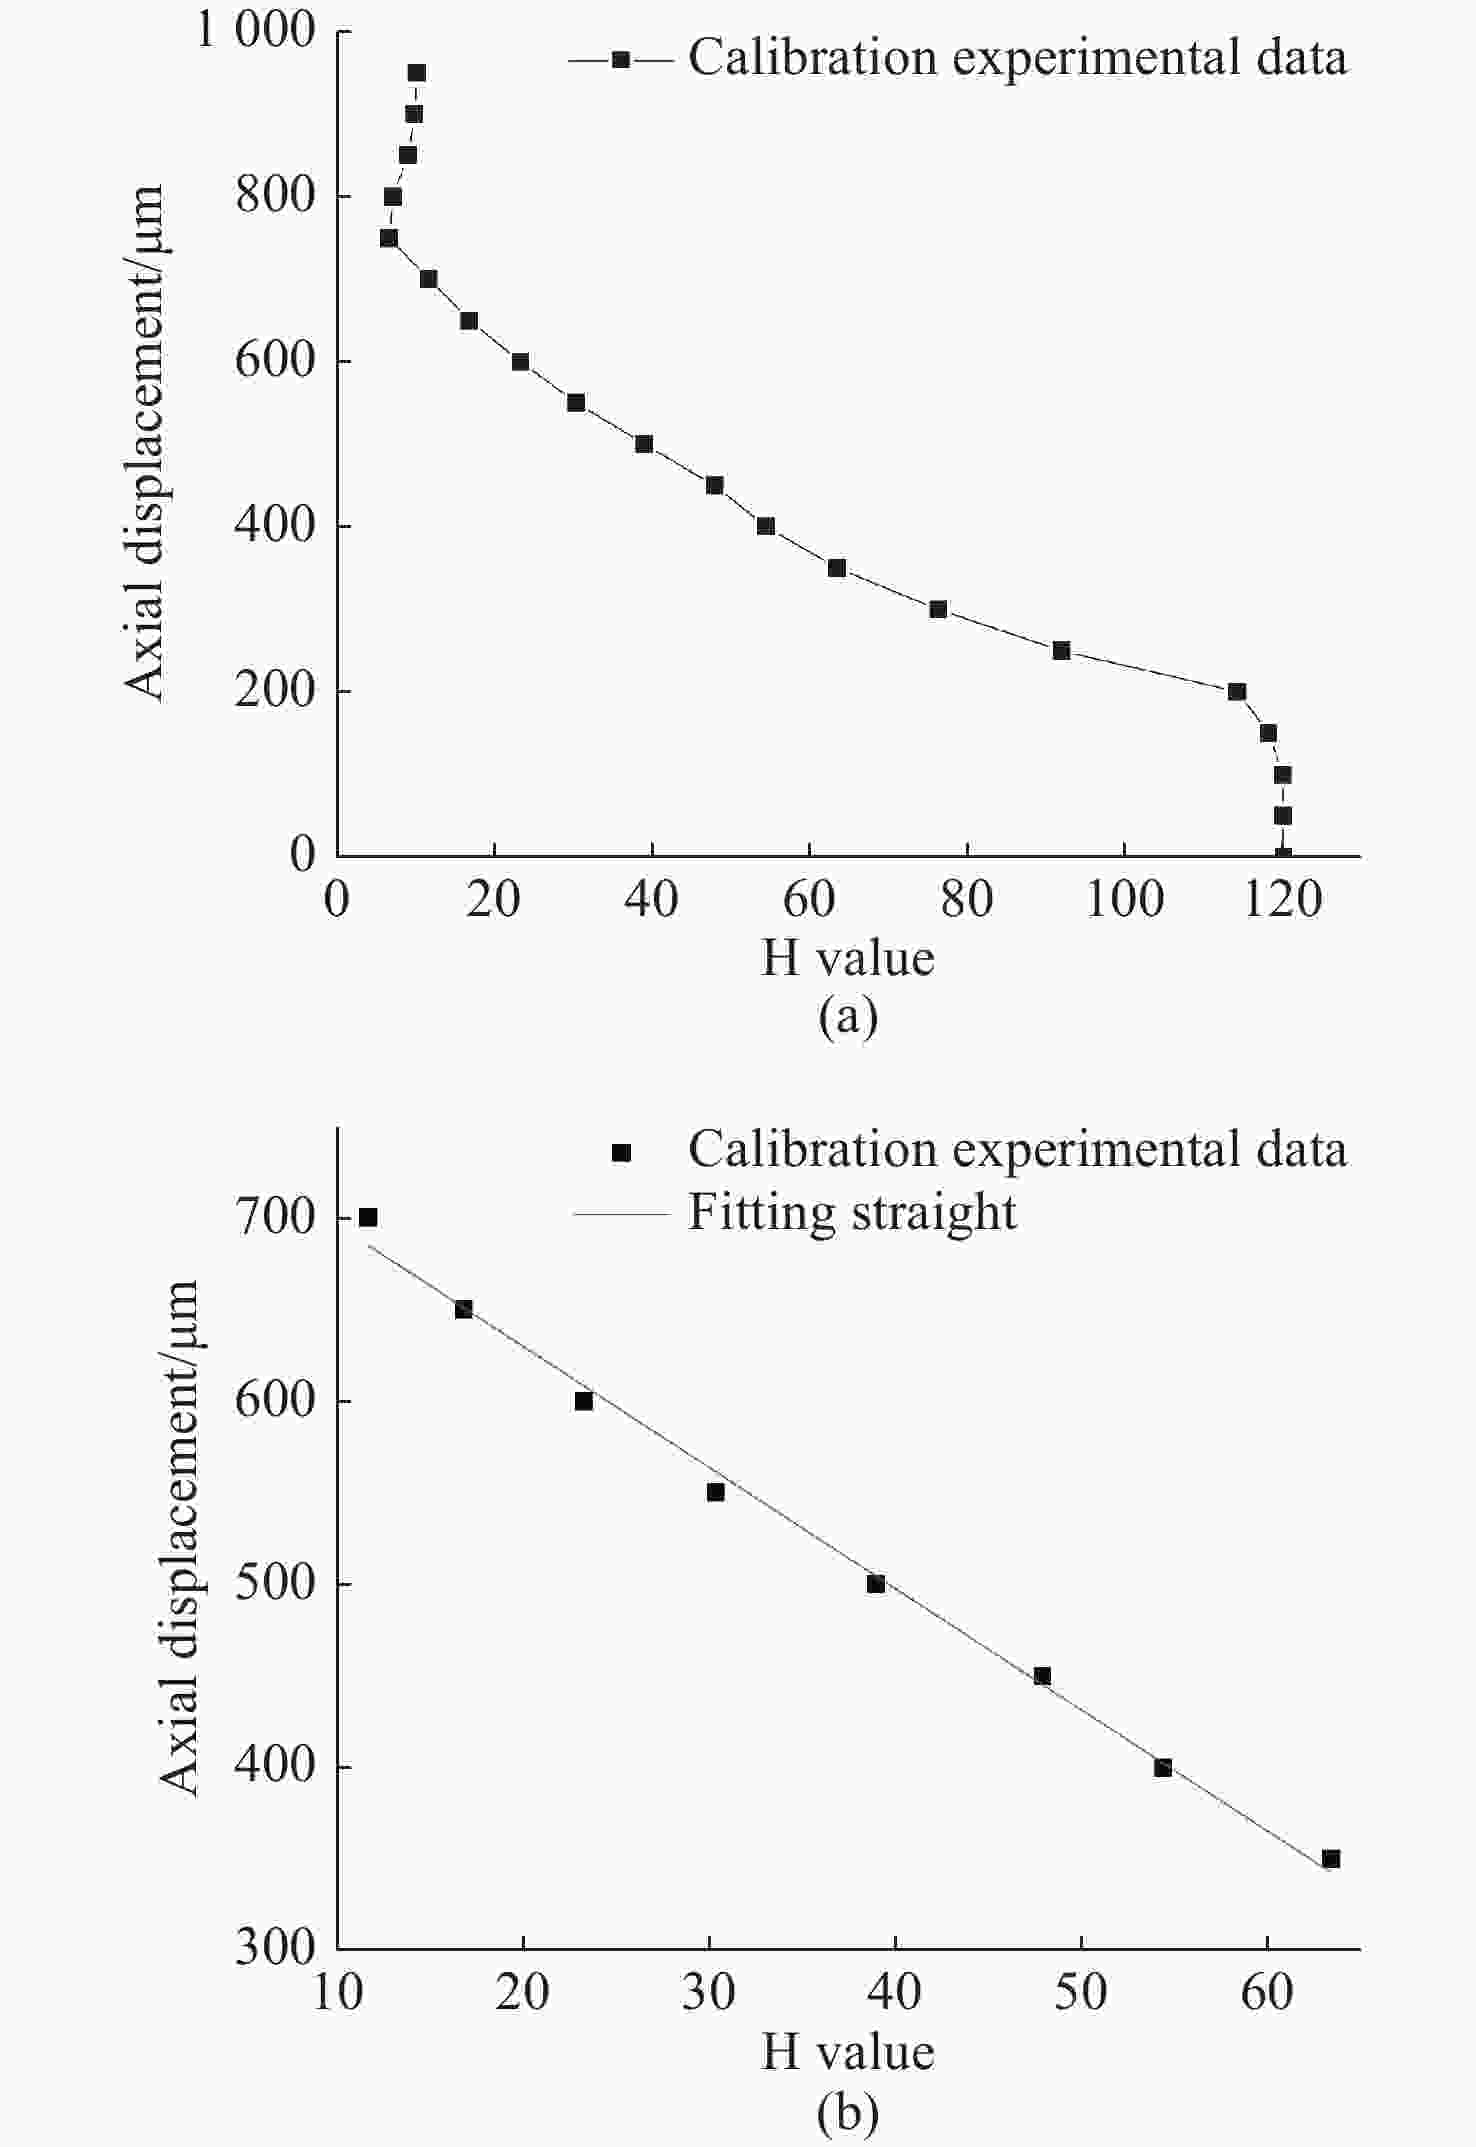
Number Axial displacement/μm H value 1 0 120.00 2 50 119.99 3 100 119.93 4 150 118.15 5 200 114.21 6 250 91.84 7 300 76.19 8 350 63.39 9 400 54.37 10 450 47.88 11 500 38.96 12 550 30.32 13 600 23.24 14 650 16.77 15 700 11.62 16 750 6.58 17 800 7.01 18 850 8.98 19 900 9.78 20 950 10.06 表 2 台阶实验数据及台阶高度计算结果
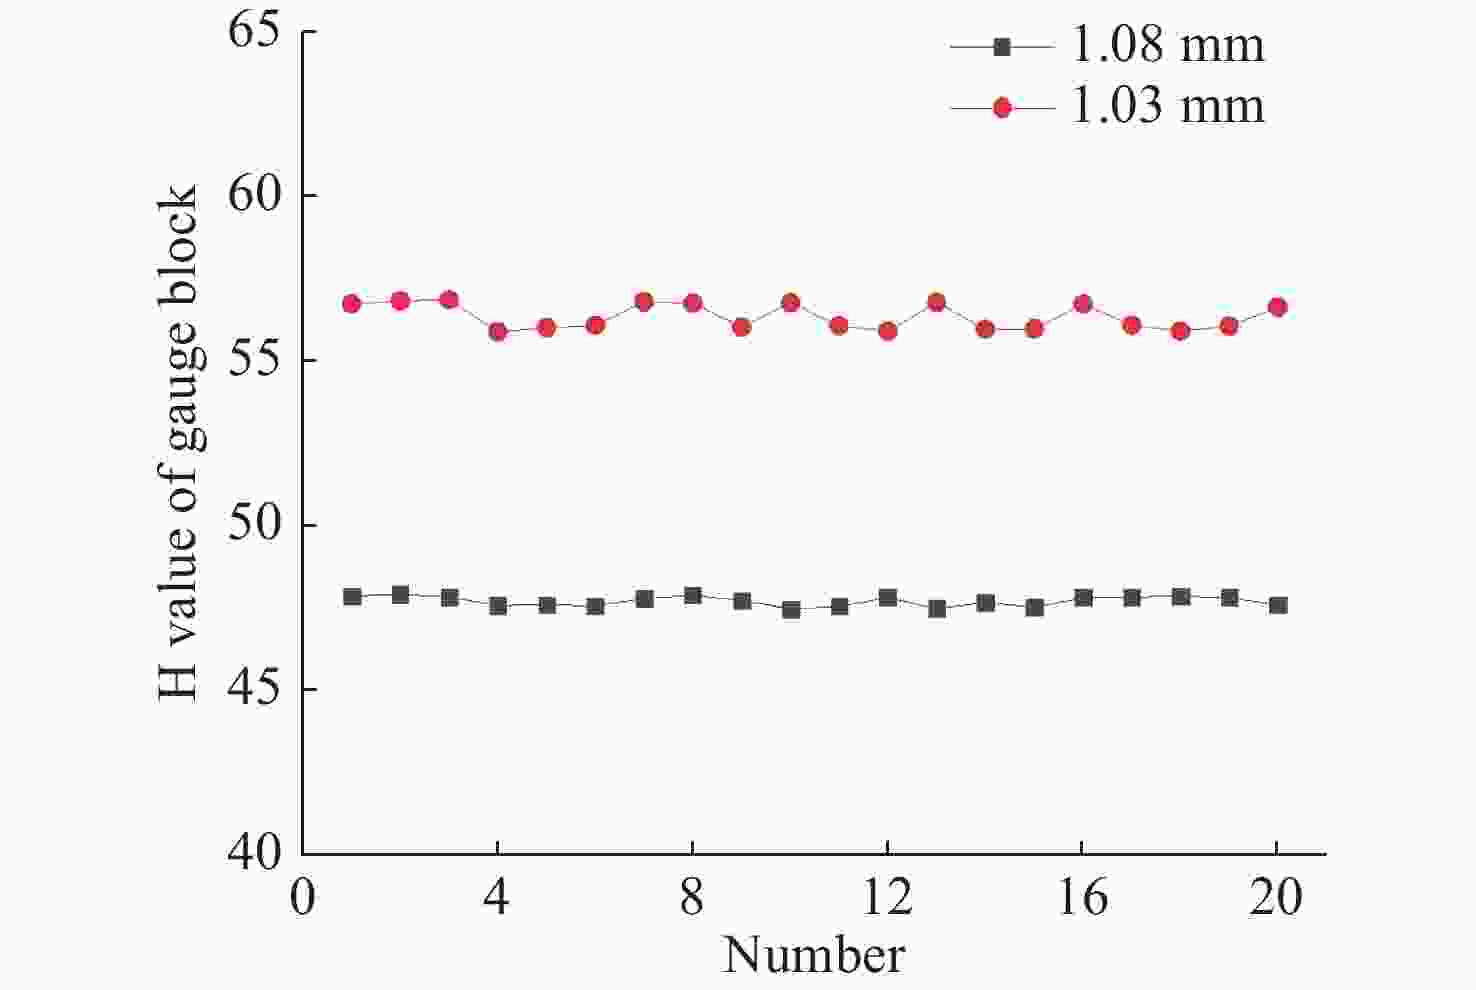
Table 2. Experimental data and calculation results of step height
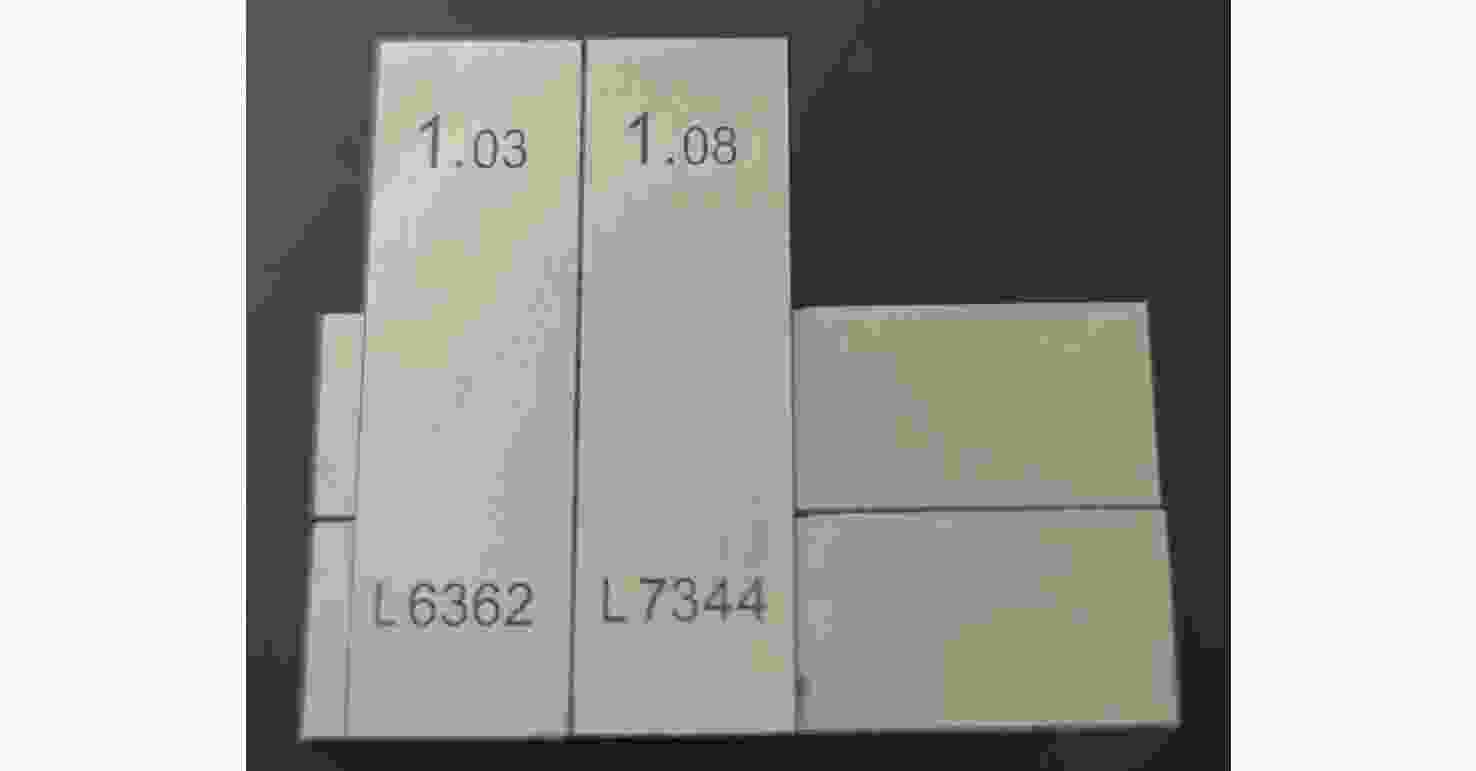
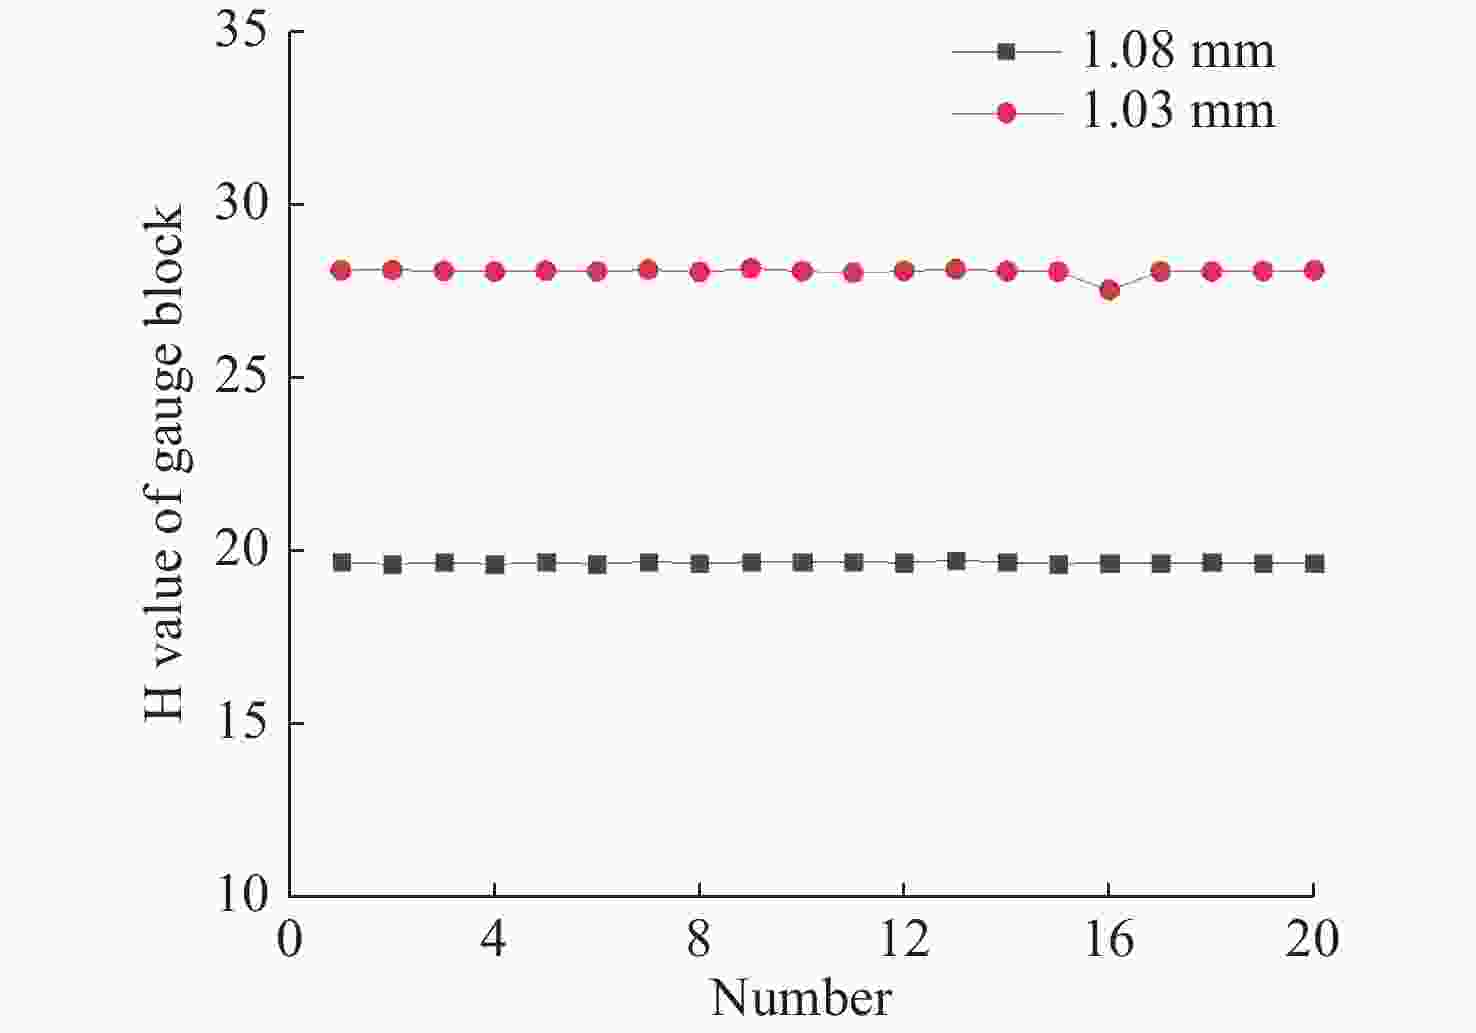
Number H value of
1.08 mmH value of
1.03 mmH Value of difference 1 19.68 28.10 8.42 2 19.62 28.11 8.49 3 19.67 28.08 8.41 4 19.62 28.07 8.45 5 19.67 28.09 8.42 6 19.62 28.07 8.45 7 19.69 28.12 8.43 8 19.64 28.06 8.42 9 19.68 28.15 8.47 10 19.69 28.08 8.39 11 19.68 28.03 8.35 12 19.66 28.08 8.42 13 19.73 28.14 8.41 14 19.67 28.08 8.41 15 19.63 28.07 8.44 16 19.65 27.52 7.87 17 19.65 28.07 8.42 18 19.67 28.07 8.40 19 19.65 28.08 8.43 20 19.64 28.10 8.46 The average value of the difference 8.40 The height value of the step (μm) 55.44 Relative error −1.91% 表 3 透明材料实验数据及厚度计算结果
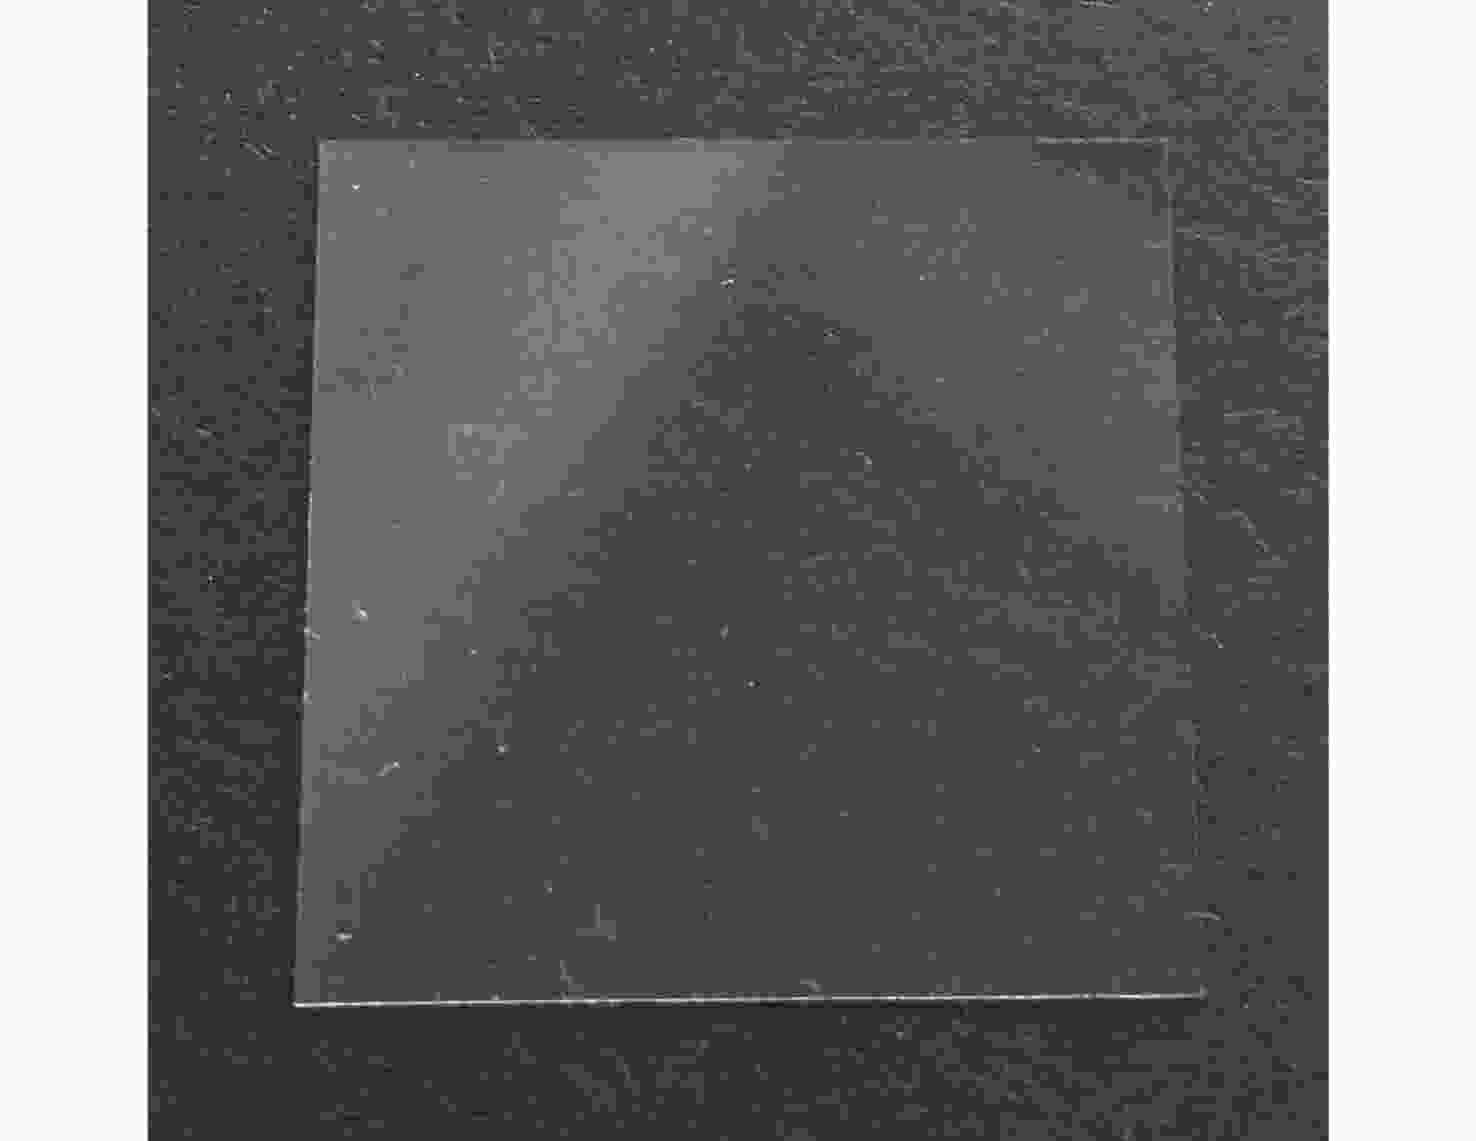
Table 3. Experimental data and calculation results of transparent specimen
Number H value of upper surface H value of lower surface H Value of difference 1 29.23 41.63 12.40 2 29.10 41.30 12.20 3 29.10 41.75 12.65 4 29.66 41.46 11.80 5 29.12 40.71 11.59 6 29.66 41.35 11.69 7 29.20 40.66 11.46 8 29.06 41.59 12.53 9 29.66 39.89 10.23 10 29.26 40.72 11.46 11 29.14 40.71 11.57 12 29.66 40.81 11.15 13 29.70 40.76 11.06 14 29.61 40.74 11.13 15 29.69 40.66 10.97 16 29.09 40.56 11.47 17 29.22 40.42 11.20 18 29.64 40.84 11.20 19 29.20 40.67 11.47 20 29.13 40.83 11.70 The average value of the difference 11.55 The thickness value of the transparent specimen (μm) 184.21 Relative error 1.73% 表 4 标定实验数据
Table 4. Calibration experimental data
Number Axial displacement(μm) H value 1 0 120.00 2 50 119.98 3 100 118.78 4 150 116.55 5 200 112.80 6 250 94.00 7 300 86.06 8 350 78.00 9 400 69.16 10 450 61.38 11 500 54.19 12 550 48.03 13 600 40.83 14 650 32.96 15 700 25.58 16 750 18.36 17 800 12.10 18 850 6.18 19 900 5.14 20 950 10.37 -
[1] 郑毅. 垂直扫描白光干涉表面形貌测量软件系统研究[D]. 武汉: 华中科技大学, 2015.ZHENG Y. A research on software system of vertical scanning white light interferometry measurement of surface topography[D]. Wuhan: Huazhong University of Science & Technology, 2015. (in Chinese) [2] YANG S CH, LIU J W, XU L F, et al. A new approach to explore the surface profile of clay soil using white light interferometry[J]. Sensors, 2020, 20(11): 3009. doi: 10.3390/s20113009 [3] 李晓洁, 赵凯, 郑兴明. 基于金宝搏188软件怎么用 三角法的地表粗糙度测试仪的研制[J]. 农业工程学报,2012,28(8):116-121. doi: 10.3969/j.issn.1002-6819.2012.08.018LI X J, ZHAO K, ZHENG X M. Development of surface roughness tester based on laser triangulation method[J]. Transactions of the Chinese Society of Agricultural Engineering, 2012, 28(8): 116-121. (in Chinese) doi: 10.3969/j.issn.1002-6819.2012.08.018 [4] 周兴敏, 刘恒彪, 葛剑敏. 金宝搏188软件怎么用 三角测量中物面反射光斑重心偏移的修正[J]. 光学学报,2015,35(5):0512001.ZHOU X M, LIU H B, GE J M. Reflected spot center offset correction in laser triangulation measurement[J]. Acta Optica Sinica, 2015, 35(5): 0512001. (in Chinese) [5] 尹云飞, 刘兆武, 吉日嘎兰图, 等. 二维光栅位移测量技术综述[J]. 中国光学,2020,13(6):1224-1238.YIN Y F, LIU ZH W, JIRIGALANTU, et al. Overview of 2D grating displacement measurement technology[J]. Chinese Optics, 2020, 13(6): 1224-1238. (in Chinese) [6] HUANG X ZH, CAO Y P, YANG CH ZH, et al. A single-shot 3D measuring method based on quadrature phase-shifting color composite grating projection[J]. Applied Sciences, 2021, 11(6): 2522. doi: 10.3390/app11062522 [7] 余卿, 余晓芬, 崔长彩, 等. 并行共焦测量中的并行光源技术综述[J]. 中国光学,2013,6(5):652-659.YU Q, YU X F, CUI CH C, et al. Survey of parallel light source technology in parallel confocal measurement[J]. Chinese Optics, 2013, 6(5): 652-659. (in Chinese) [8] 赵家旺, 张运海, 王发民, 等. 线扫描虚拟结构调制共聚焦显微成像[J]. 中国光学,2021,14(2):431-445.ZHAO J W, ZHANG Y H, WANG F M, et al. Line-scanning confocal microscopic imaging based on virtual structured modulation[J]. Chinese Optics, 2021, 14(2): 431-445. (in Chinese) [9] 张昆. 基于色域空间调制技术的彩色共聚焦三维形貌测量系统及其实验研究[D]. 厦门: 华侨大学, 2020.ZHANG K. Chromatic confocal three-dimensional topography measurement system based on color spatial modulation technology and experimental research[D]. Xiamen: Huaqiao University, 2020. (in Chinese) [10] 唐兴, 王琦, 马小军, 等. 靶丸内表面轮廓的白光共焦光谱测量技术[J]. 中国光学,2020,13(2):266-272.TANG X, WANG Q, MA X J, et al. Determination of the inner-surface profile of a capsule using chromatic confocal spectroscopy[J]. Chinese Optics, 2020, 13(2): 266-272. (in Chinese) [11] 邹景武, 余卿, 程方. 差动式彩色共聚焦粗糙度评定系统及实验研究[J]. 中国光学,2020,13(5):1103-1114.ZOU J W, YU Q, CHENG F. Differential chromatic confocal roughness evaluation system and experimental research[J]. Chinese Optics, 2020, 13(5): 1103-1114. (in Chinese) [12] FU SH W, KOR W S, CHENG F, et al. In-situ measurement of surface roughness using chromatic confocal sensor[J]. Procedia CIRP, 2020, 94: 780-784. doi: 10.1016/j.procir.2020.09.133 [13] 马敬, 齐月静, 卢增雄, 等. 光谱共焦位移传感器线性色散物镜设计[J]. 中国金宝搏188软件怎么用 ,2019,46(7):0704009.MA J, QI Y J, LU Z X, et al. Design of linear dispersive objective for chromatic confocal displacement sensor[J]. Chinese Journal of Lasers, 2019, 46(7): 0704009. (in Chinese) [14] YU Q, ZHANG K, CUI CH C, et al. Method of thickness measurement for transparent specimens with chromatic confocal microscopy[J]. Applied Optics, 2018, 57(33): 9722-9728. doi: 10.1364/AO.57.009722 [15] 张雅丽, 余卿, 程方, 等. 光纤束并行彩色共聚焦测量系统及实验研究[J]. 仪器仪表学报,2020,41(12):23-31.ZHANG Y L, YU Q, CHENG F, et al. Parallel chromatic confocal measurement system based on optical fiber bundle and its experimental study[J]. Chinese Journal of Scientific Instrument, 2020, 41(12): 23-31. (in Chinese) [16] 张一, 余卿, 张昆, 等. 基于数字微镜器件的并行彩色共聚焦测量系统[J]. 光学 精密工程,2020,28(4):859-866.ZHANG Y, YU Q, ZHANG K, et al. Parallel chromatic confocal measurement system based on digital micromirror device[J]. Optics and Precision Engineering, 2020, 28(4): 859-866. (in Chinese) [17] ZHANG Z L, LU R SH. Initial structure of dispersion objective for chromatic confocal sensor based on doublet lens[J]. Optics and Lasers in Engineering, 2021, 139: 106424. [18] LU W L, CHEN CH, WANG J, et al. Characterization of the displacement response in chromatic confocal microscopy with a hybrid radial basis function network[J]. Optics Express, 2019, 27(16): 22737-22752. [19] LI J F, ZHAO Y L, DU H, et al. Adaptive modal decomposition based overlapping-peaks extraction for thickness measurement in chromatic confocal microscopy[J]. Optics Express, 2020, 28(24): 36176-36187. [20] SATO R, CHEN CH, MATSUKUMA H, et al. A new signal processing method for a differential chromatic confocal probe with a mode-locked femtosecond laser[J]. Measurement Science and Technology, 2020, 31(9): 094004. [21] BERKOVIC G, ZILBERMAN S, SHAFIR E, et al. Chromatic confocal displacement sensing at oblique incidence angles[J]. Applied Optics, 2020, 59(10): 3183-3186. [22] YU Q, ZHANG Y L, SHANG W J, et al. Thickness measurement for glass slides based on chromatic confocal microscopy with inclined illumination[J]. Photonics, 2021, 8(5): 170. -


 下载:
下载:
