-
摘要:
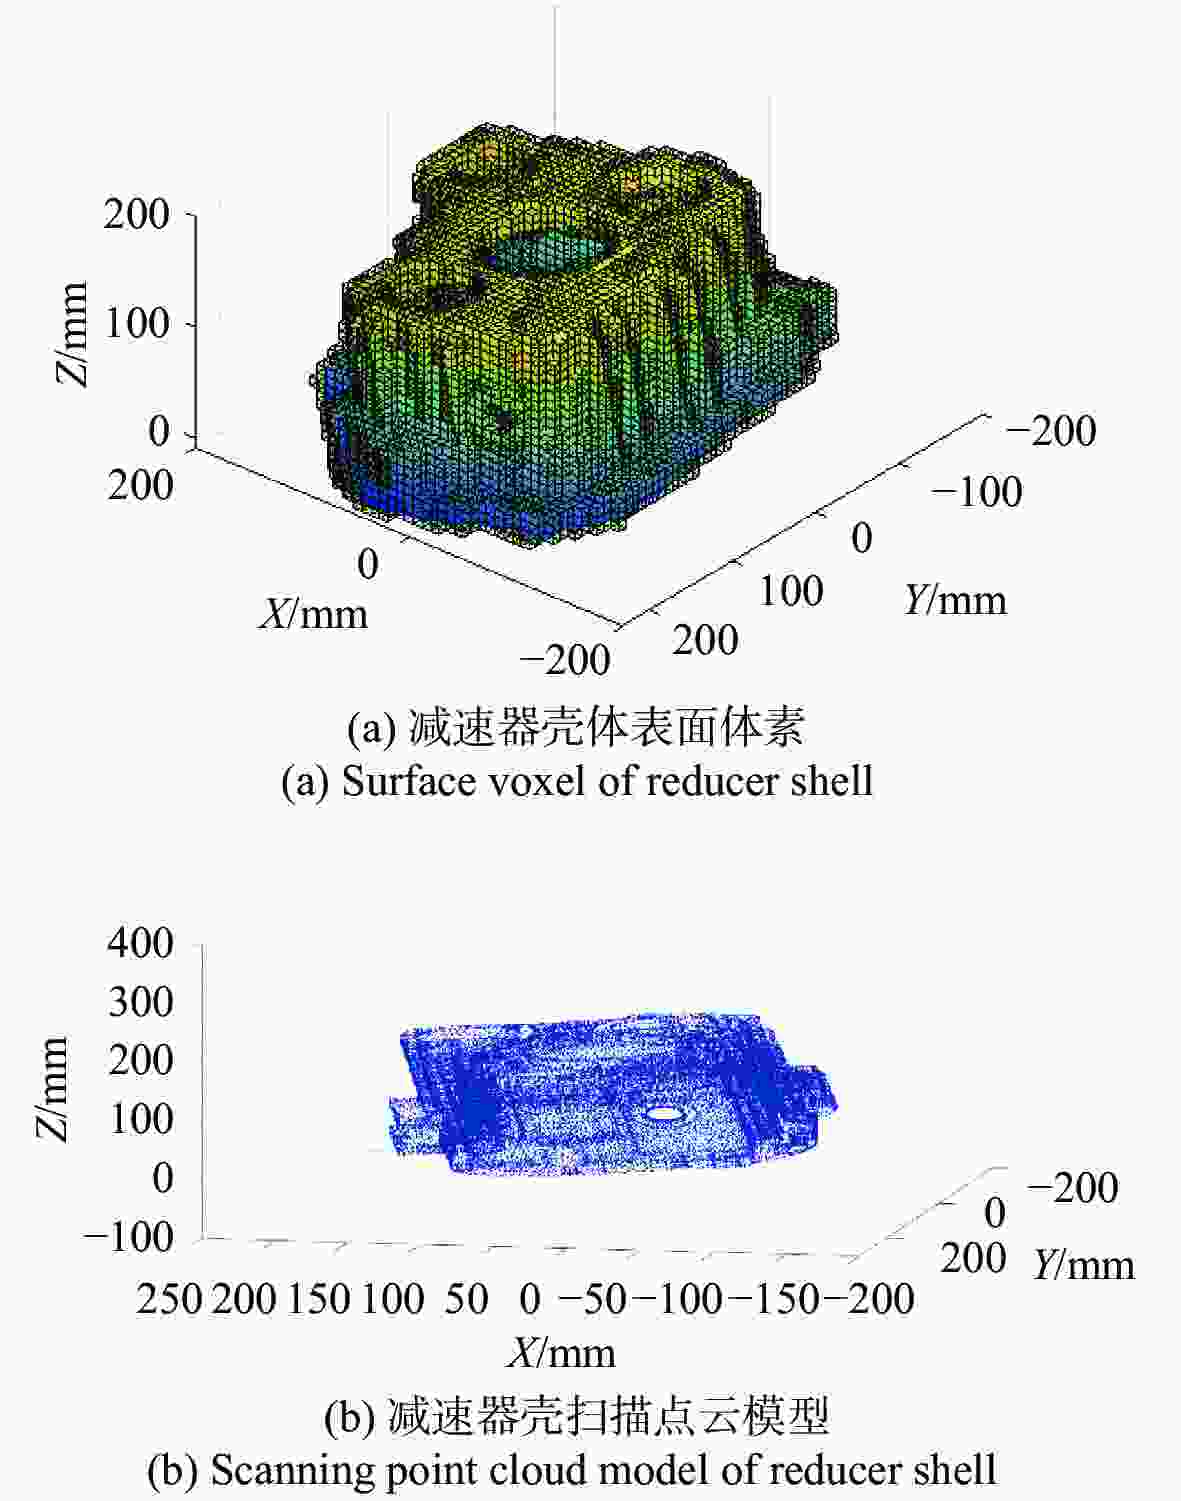
为了实现复杂曲面零件高效自动化测量,本文提出了一种基于改进栅格法的面结构光扫描视点规划方法,并将其应用在汽车复杂曲面零件自动化测量中。首先,针对人工示教视点冗余严重,扫描完整性差的问题,提出了一种基于改进栅格法的面结构光扫描视点规划算法,根据面结构光扫描仪的有效测量范围,确定栅格尺寸,改进候选视点生成策略,并通过扫描仪的测量约束条件得到候选视点的有效测量范围,利用视点质量评价函数确定最优视点。其次,针对视点规划过程中算法耗时长,特征重建精度低的问题,采用体素网格法简化模型,通过八叉树算法分割复杂曲面模型,根据法向量一致性误差确定体素网格尺寸,并且对于几何特征不同的模型,分析权重系数对扫描质量的影响,给出最佳权重系数。最后,进行了汽车钣金件和减速器壳体扫描视点规划和测量实验。结果表明,汽车钣金件视点规划耗时21.93 s,扫描完整性为99.124%,扫描精度为0.025 mm;汽车减速器壳体视点规划耗时158.29 s,扫描完整性为93.231%,扫描精度为0.032 mm。本方法能快速完成复杂曲面视点规划,并且采用规划视点扫描的模型完整性好,精度高,能够满足复杂曲面零件自动测量的要求。
Abstract:In order to realize the efficient and automatic measurement of complex curved surface parts, we propose a viewpoint planning method of surface structured light scanning based on an improved grid method, and apply it to the automatic measurement of automobile parts with complex curved surface. Firstly, aiming at the problem of serious redundancy and poor scanning integrity of the manual teaching viewpoint, a scanning viewpoint planning algorithm for surface structured light based on an improved grid method is proposed. According to the effective measurement range of a surface structured light scanner, the grid size is determined, and the candidate viewpoint generation strategy is improved. The effective measurement range of candidate viewpoints is obtained by the measurement constraint condition of the scanner, and the optimal viewpoint is determined by the viewpoint quality evaluation function. Secondly, in view of the low efficiency of the algorithm and the low accuracy of feature reconstruction in the process of viewpoint planning, the voxel grid method is used to simplify the model. The complex surface model is segmented by the octree algorithm, and the voxel grid size is determined according to the normal vector consistency error. For the models with different geometric characteristics, the influence of the weight coefficient on the scanning quality is analyzed, and the optimal weight coefficient is given. Finally, the scanning viewpoint planning and measurement experiments of automobile sheet metal parts and reducer shell are carried out. The results show that the viewpoint planning of the automobile sheet metal parts takes 21.93 s, the scanning integrity is 99.124%, and the scanning accuracy is 0.025 mm. The viewpoint planning of automobile reducer shell takes 158.29 s, its scanning integrity is 93.231%, and its scanning accuracy is 0.032 mm. This method can quickly complete the viewpoint planning of complex curved surfaces, and the model obtained by planning viewpoint scanning has good integrity and high precision, which can meet the requirements of complex curved surface parts for automatic measurement.
-
表 1 体素网格扫描质量评价指标
Table 1. Quality evaluation indexes of voxel mesh
角度范围(°) 0<φ<25 25<φ<50 50<φ<75 75<φ 扫描质量 优秀 良好 中等 差 -
[1] 洪华杰, 甘子豪, 何科延, 等. 用于曲面轮廓测量的结构光视觉技术研究[J]. 自动化仪表,2021,42(7):1-5.HONG H J, GAN Z H, HE K Y, et al. Research on structured light vision technology for surface contour measurement[J]. Process Automation Instrumentation, 2021, 42(7): 1-5. (in Chinese) [2] 王永红, 张倩, 胡寅, 等. 显微条纹投影小视场三维表面成像技术综述[J]. 中国光学,2021,14(3):447-457. doi: 10.37188/CO.2020-0199WANG Y H, ZHANG Q, HU Y, et al. 3D small-field surface imaging based on microscopic fringe projection profilometry: a review[J]. Chinese Optics, 2021, 14(3): 447-457. (in Chinese) doi: 10.37188/CO.2020-0199 [3] 杜明鑫, 闫钰锋, 张燃, 等. 基于透镜阵列的三维姿态角度测量[J]. 中国光学,2022,15(1):45-55. doi: 10.37188/CO.2021-0129DU M X, YAN Y F, ZHANG R, et al. 3D position angle measurement based on a lens array[J]. Chinese Optics, 2022, 15(1): 45-55. (in Chinese) doi: 10.37188/CO.2021-0129 [4] 陈仁虹, 梁晋, 叶美图, 等. 柔性复合薄膜成形极限曲线的视觉测定方法[J]. 中国光学,2022,15(1):22-33. doi: 10.37188/CO.2021-0101CHEN R H, LIANG J, YE M T, et al. Visual method for measuring forming limit curve of pliable composite film[J]. Chinese Optics, 2022, 15(1): 22-33. (in Chinese) doi: 10.37188/CO.2021-0101 [5] GERBINO S, DEL GIUDICE D M, STAIANO G, et al. On the influence of scanning factors on the laser scanner-based 3D inspection process[J]. The International Journal of Advanced Manufacturing Technology, 2016, 84(9): 1787-1799. [6] PHAN N D M, QUINSAT Y, LAVERNHE S, et al. Scanner path planning with the control of overlap for part inspection with an industrial robot[J]. The International Journal of Advanced Manufacturing Technology, 2018, 98(1): 629-643. [7] 廖一帆. 基于视点规划的自动三维重建关键技术研究[D]. 深圳: 深圳大学, 2019: 22-25.LIAO Y F. Research on key techniques of automatic 3D reconstruction based on viewpoint planning[D]. Shenzhen: Shenzhen University, 2019: 22-25. (in Chinese) [8] 郭一佟. 三维面扫描测量机器人路径规划研究与实现[D]. 合肥: 合肥工业大学, 2020: 34-41.GUO Y T. Research and implementation of path planning algorithm for robotic 3D areal scanners[D]. Hefei: Hefei University of Technology, 2020: 34-41. (in Chinese) [9] LEE I D, SEO J H, KIM Y M, et al. Automatic pose generation for robotic 3-D scanning of mechanical parts[J]. IEEE Transactions on Robotics, 2020, 36(4): 1219-1238. doi: 10.1109/TRO.2020.2980161 [10] MARTINS F A R, GARCÍA-BERMEJO J G, CASANOVA E Z, et al. Automated 3D surface scanning based on CAD model[J]. Mechatronics, 2005, 15(7): 837-857. doi: 10.1016/j.mechatronics.2005.01.004 [11] LARTIGUE C, QUINSAT Y, MEHDI-SOUZANI C, et al. Voxel-based path planning for 3D scanning of mechanical parts[J]. Computer-Aided Design and Applications, 2014, 11(2): 220-227. doi: 10.1080/16864360.2014.846096 [12] 韩沛文. 面结构光自动化三维测量中视点生成与路径规划关键技术研究[D]. 武汉: 华中科技大学, 2018: 19-24.HAN P W. Research on key technique of viewpoint generation and path planning for automated surface structured-light 3D measurement[D]. Wuhan: Huazhong University of Science and Technology, 2018: 19-24. (in Chinese) [13] 李中伟, 张攀, 钟凯, 等. AutoScan系列复杂零件自动化三维测量装备开发与应用[J]. 航空学报,2021,42(10):112-129.LI ZH W, ZHANG P, ZHONG K, et al. Development and application of AutoScan series automated 3D measuring equipment for complex parts[J]. Acta Aeronauticaet Astronautica Sinica, 2021, 42(10): 112-129. (in Chinese) -


 下载:
下载:
