Error correction of glass mediums in high-temperature digital image correlation deformation measurement
-
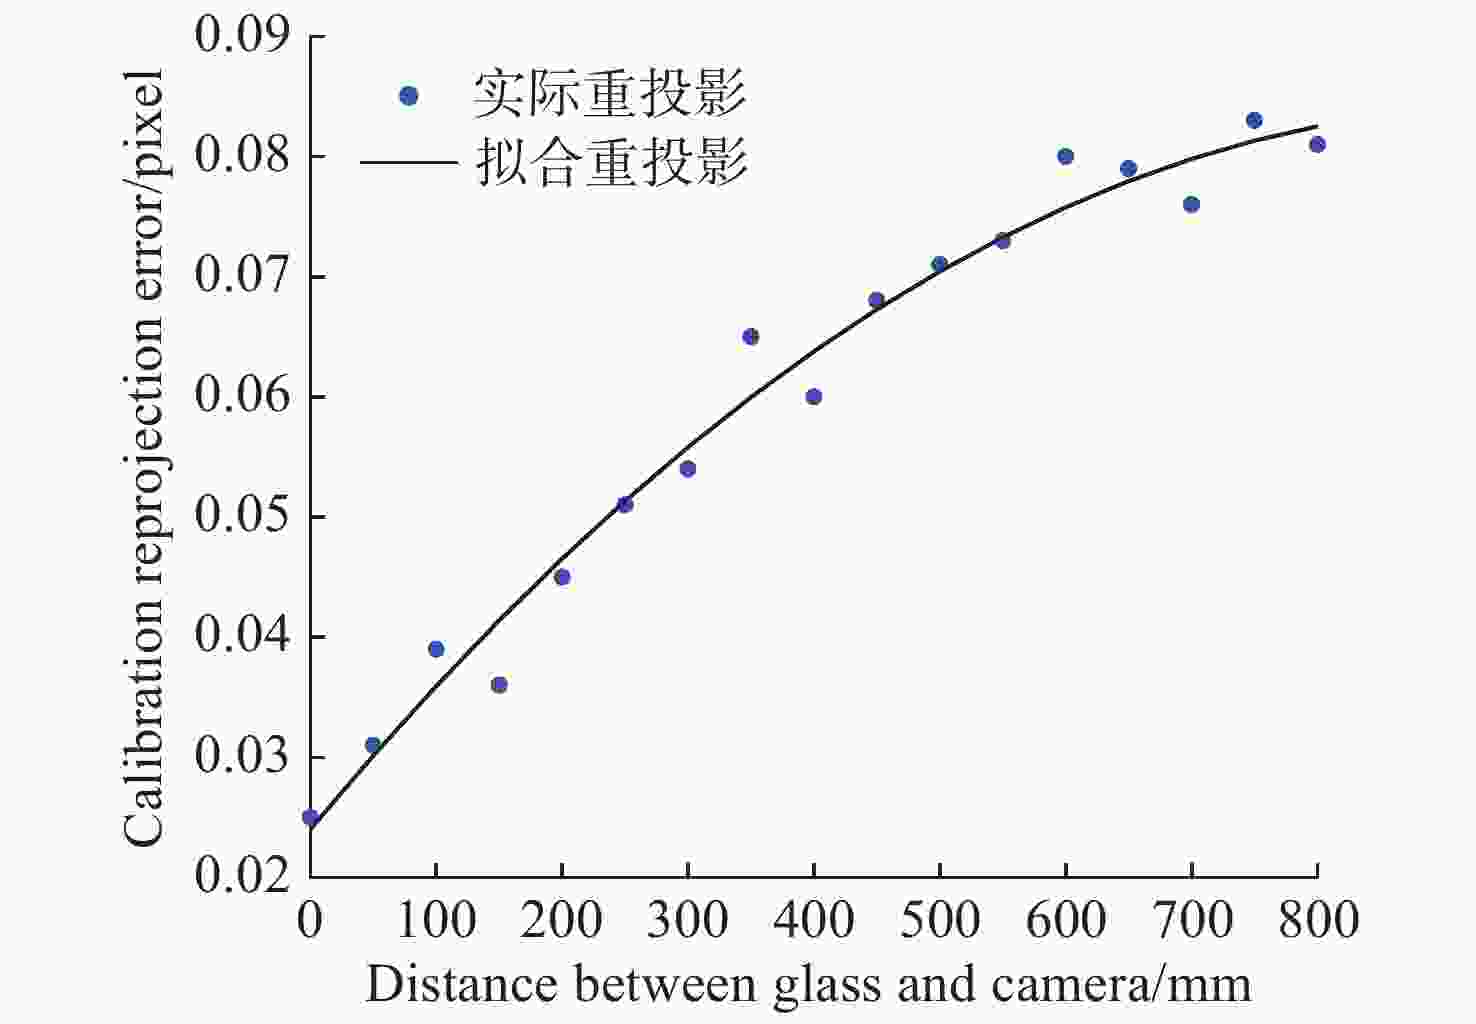
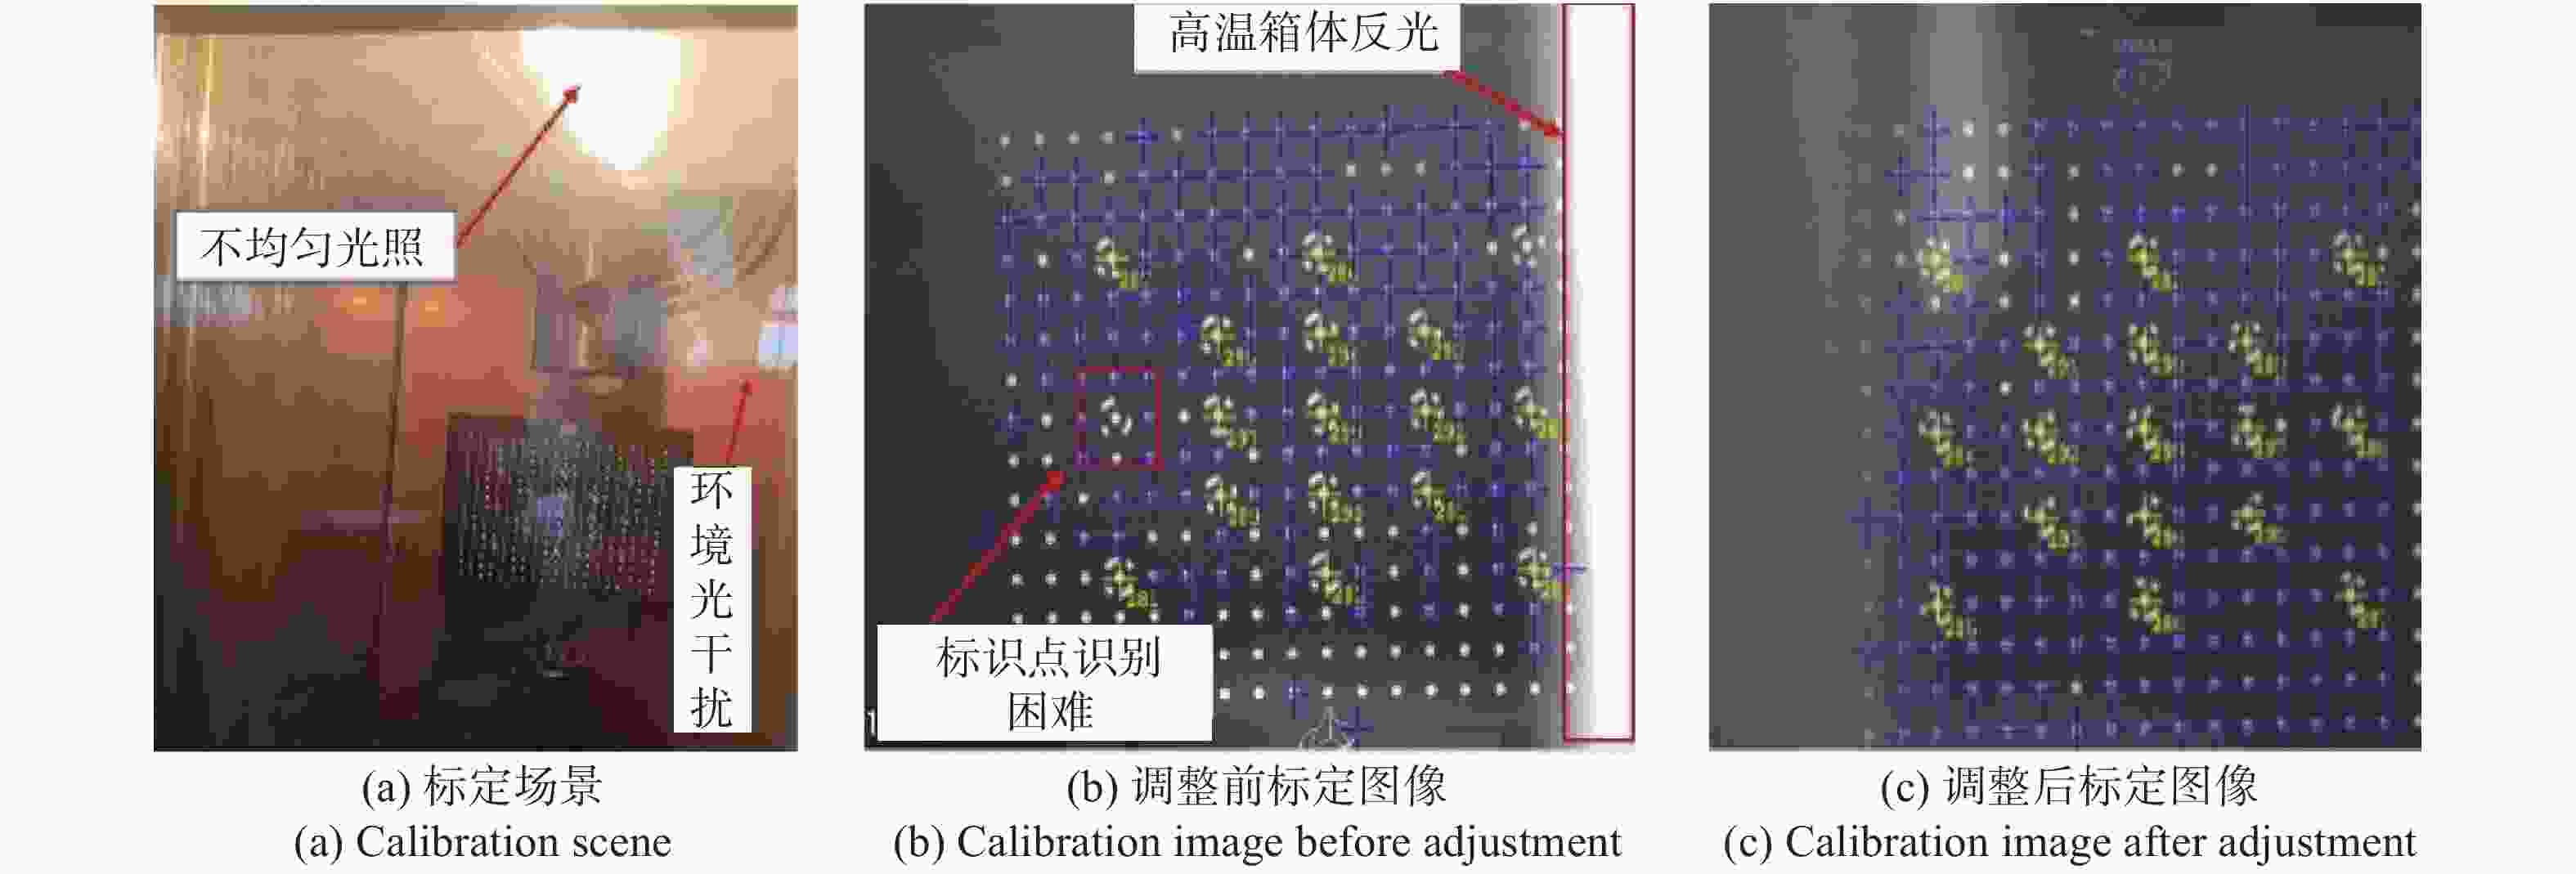
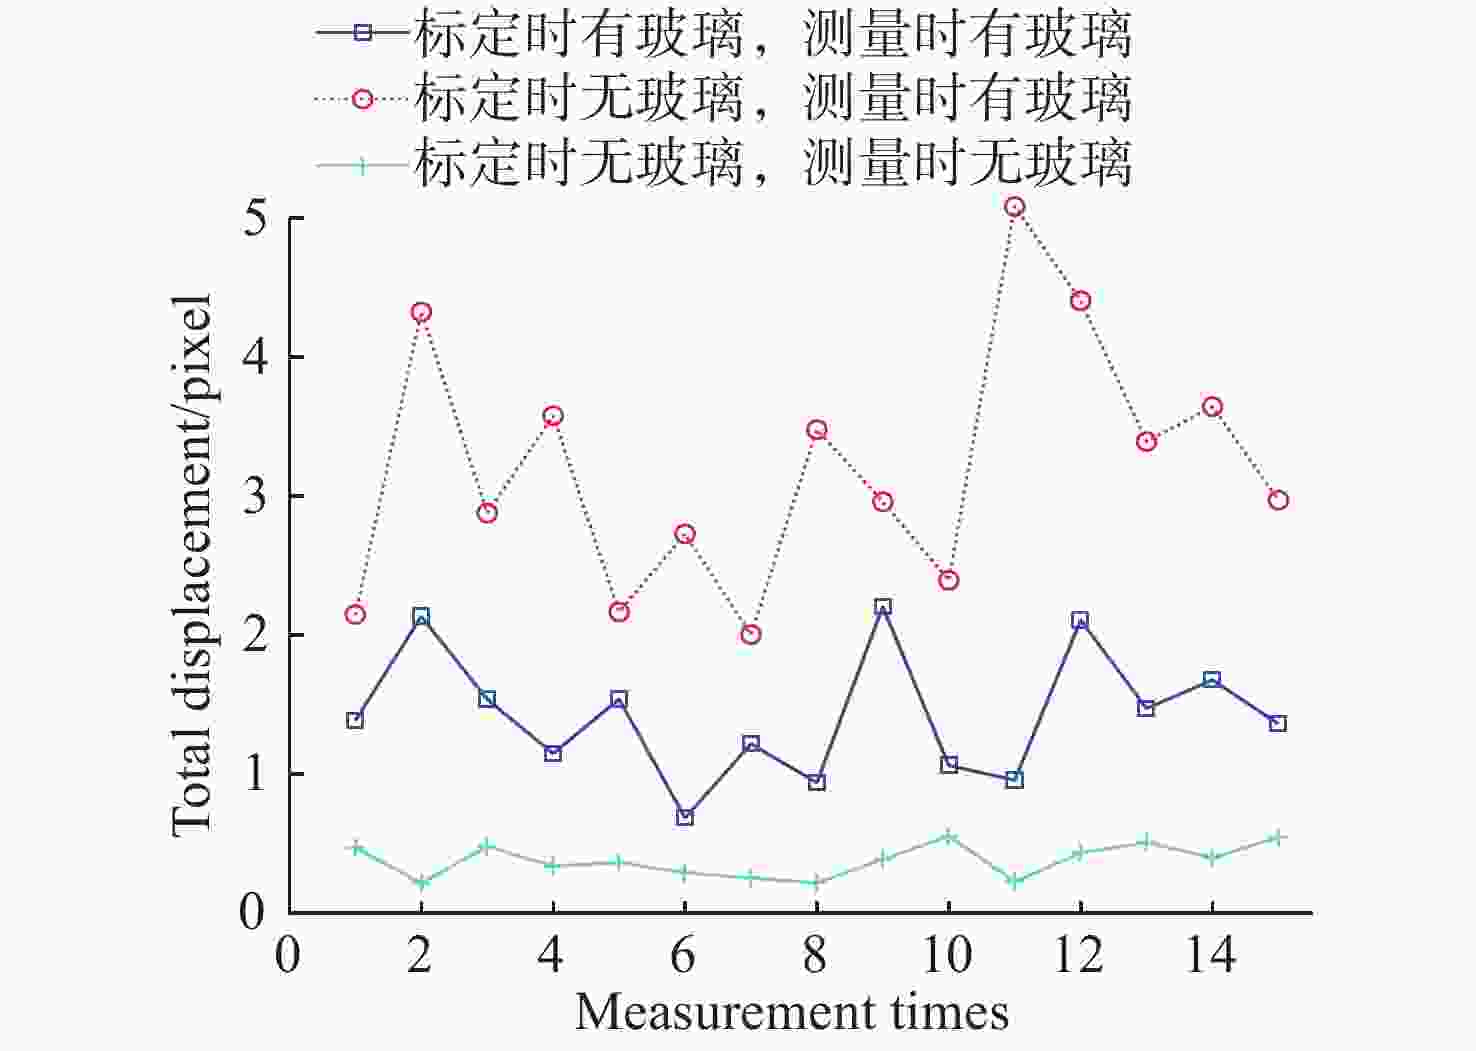
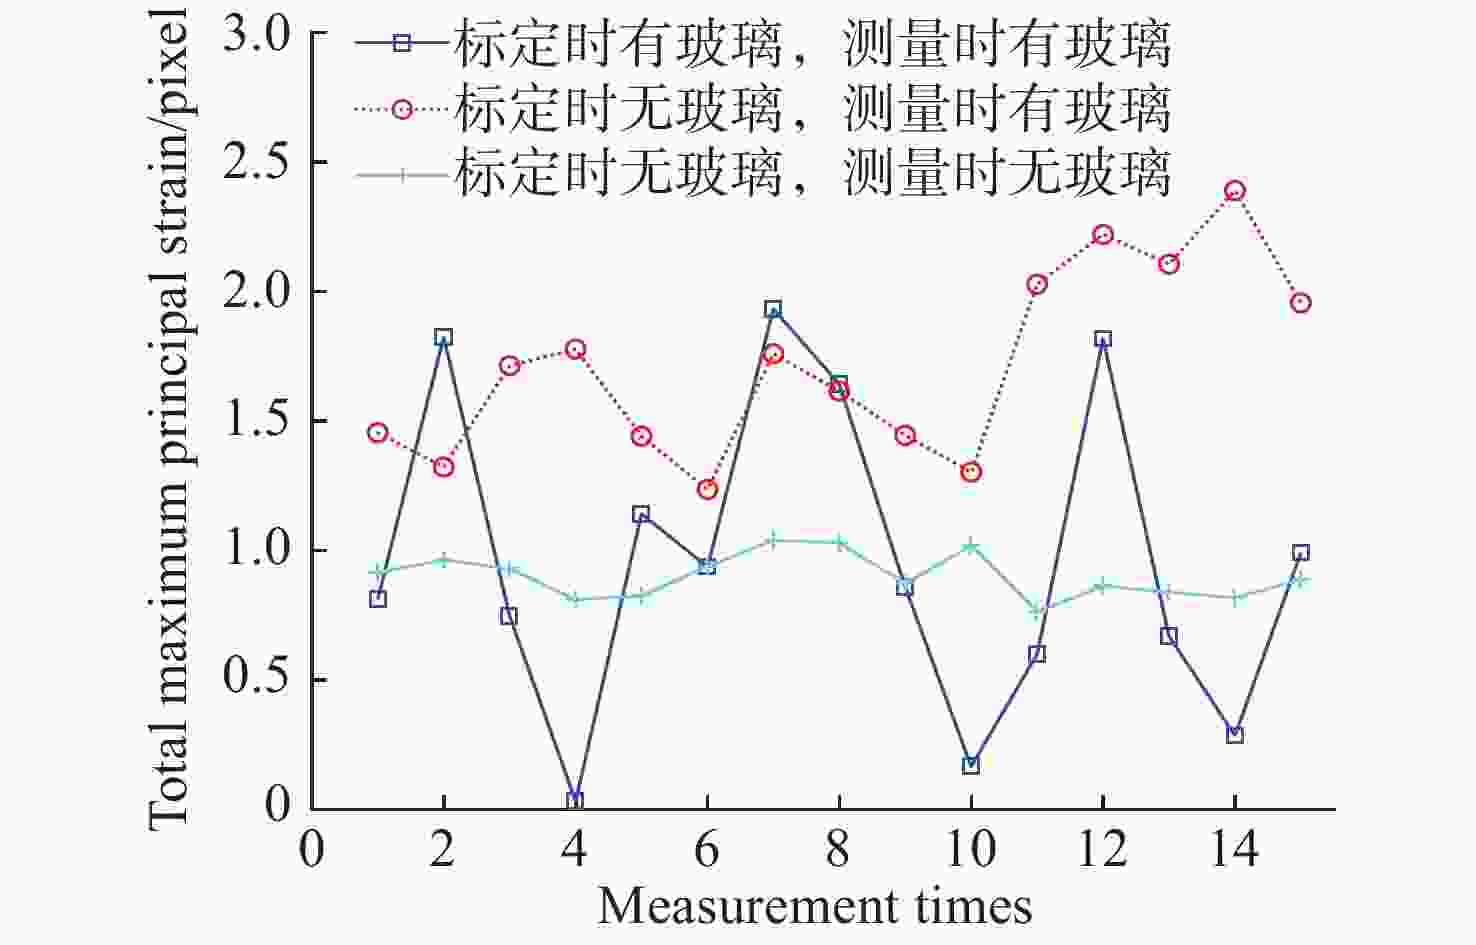
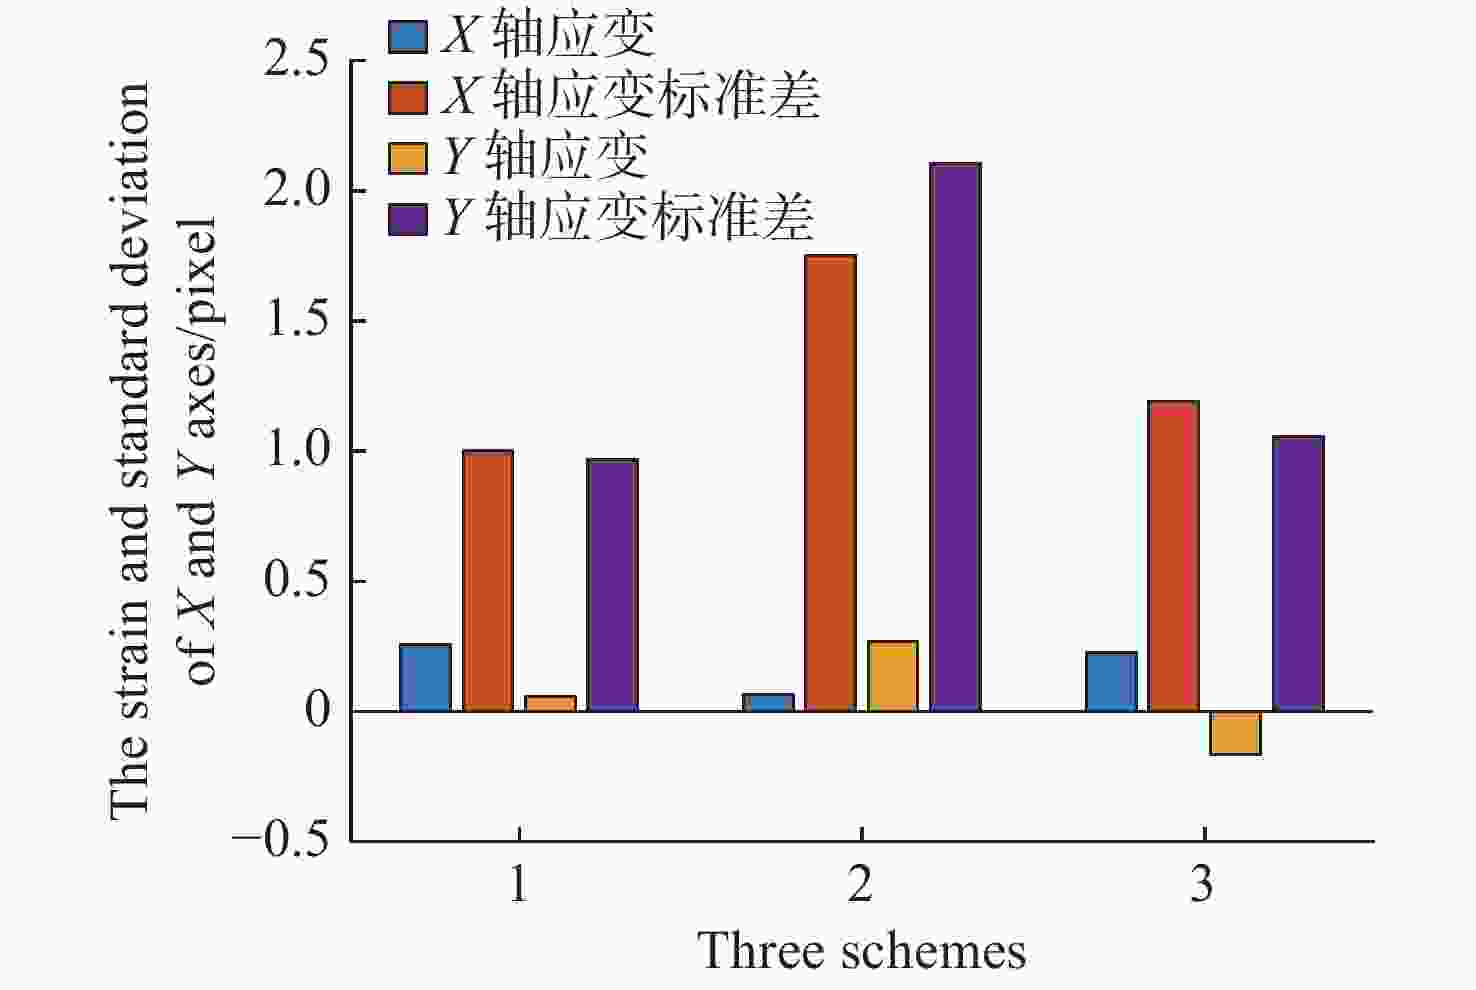
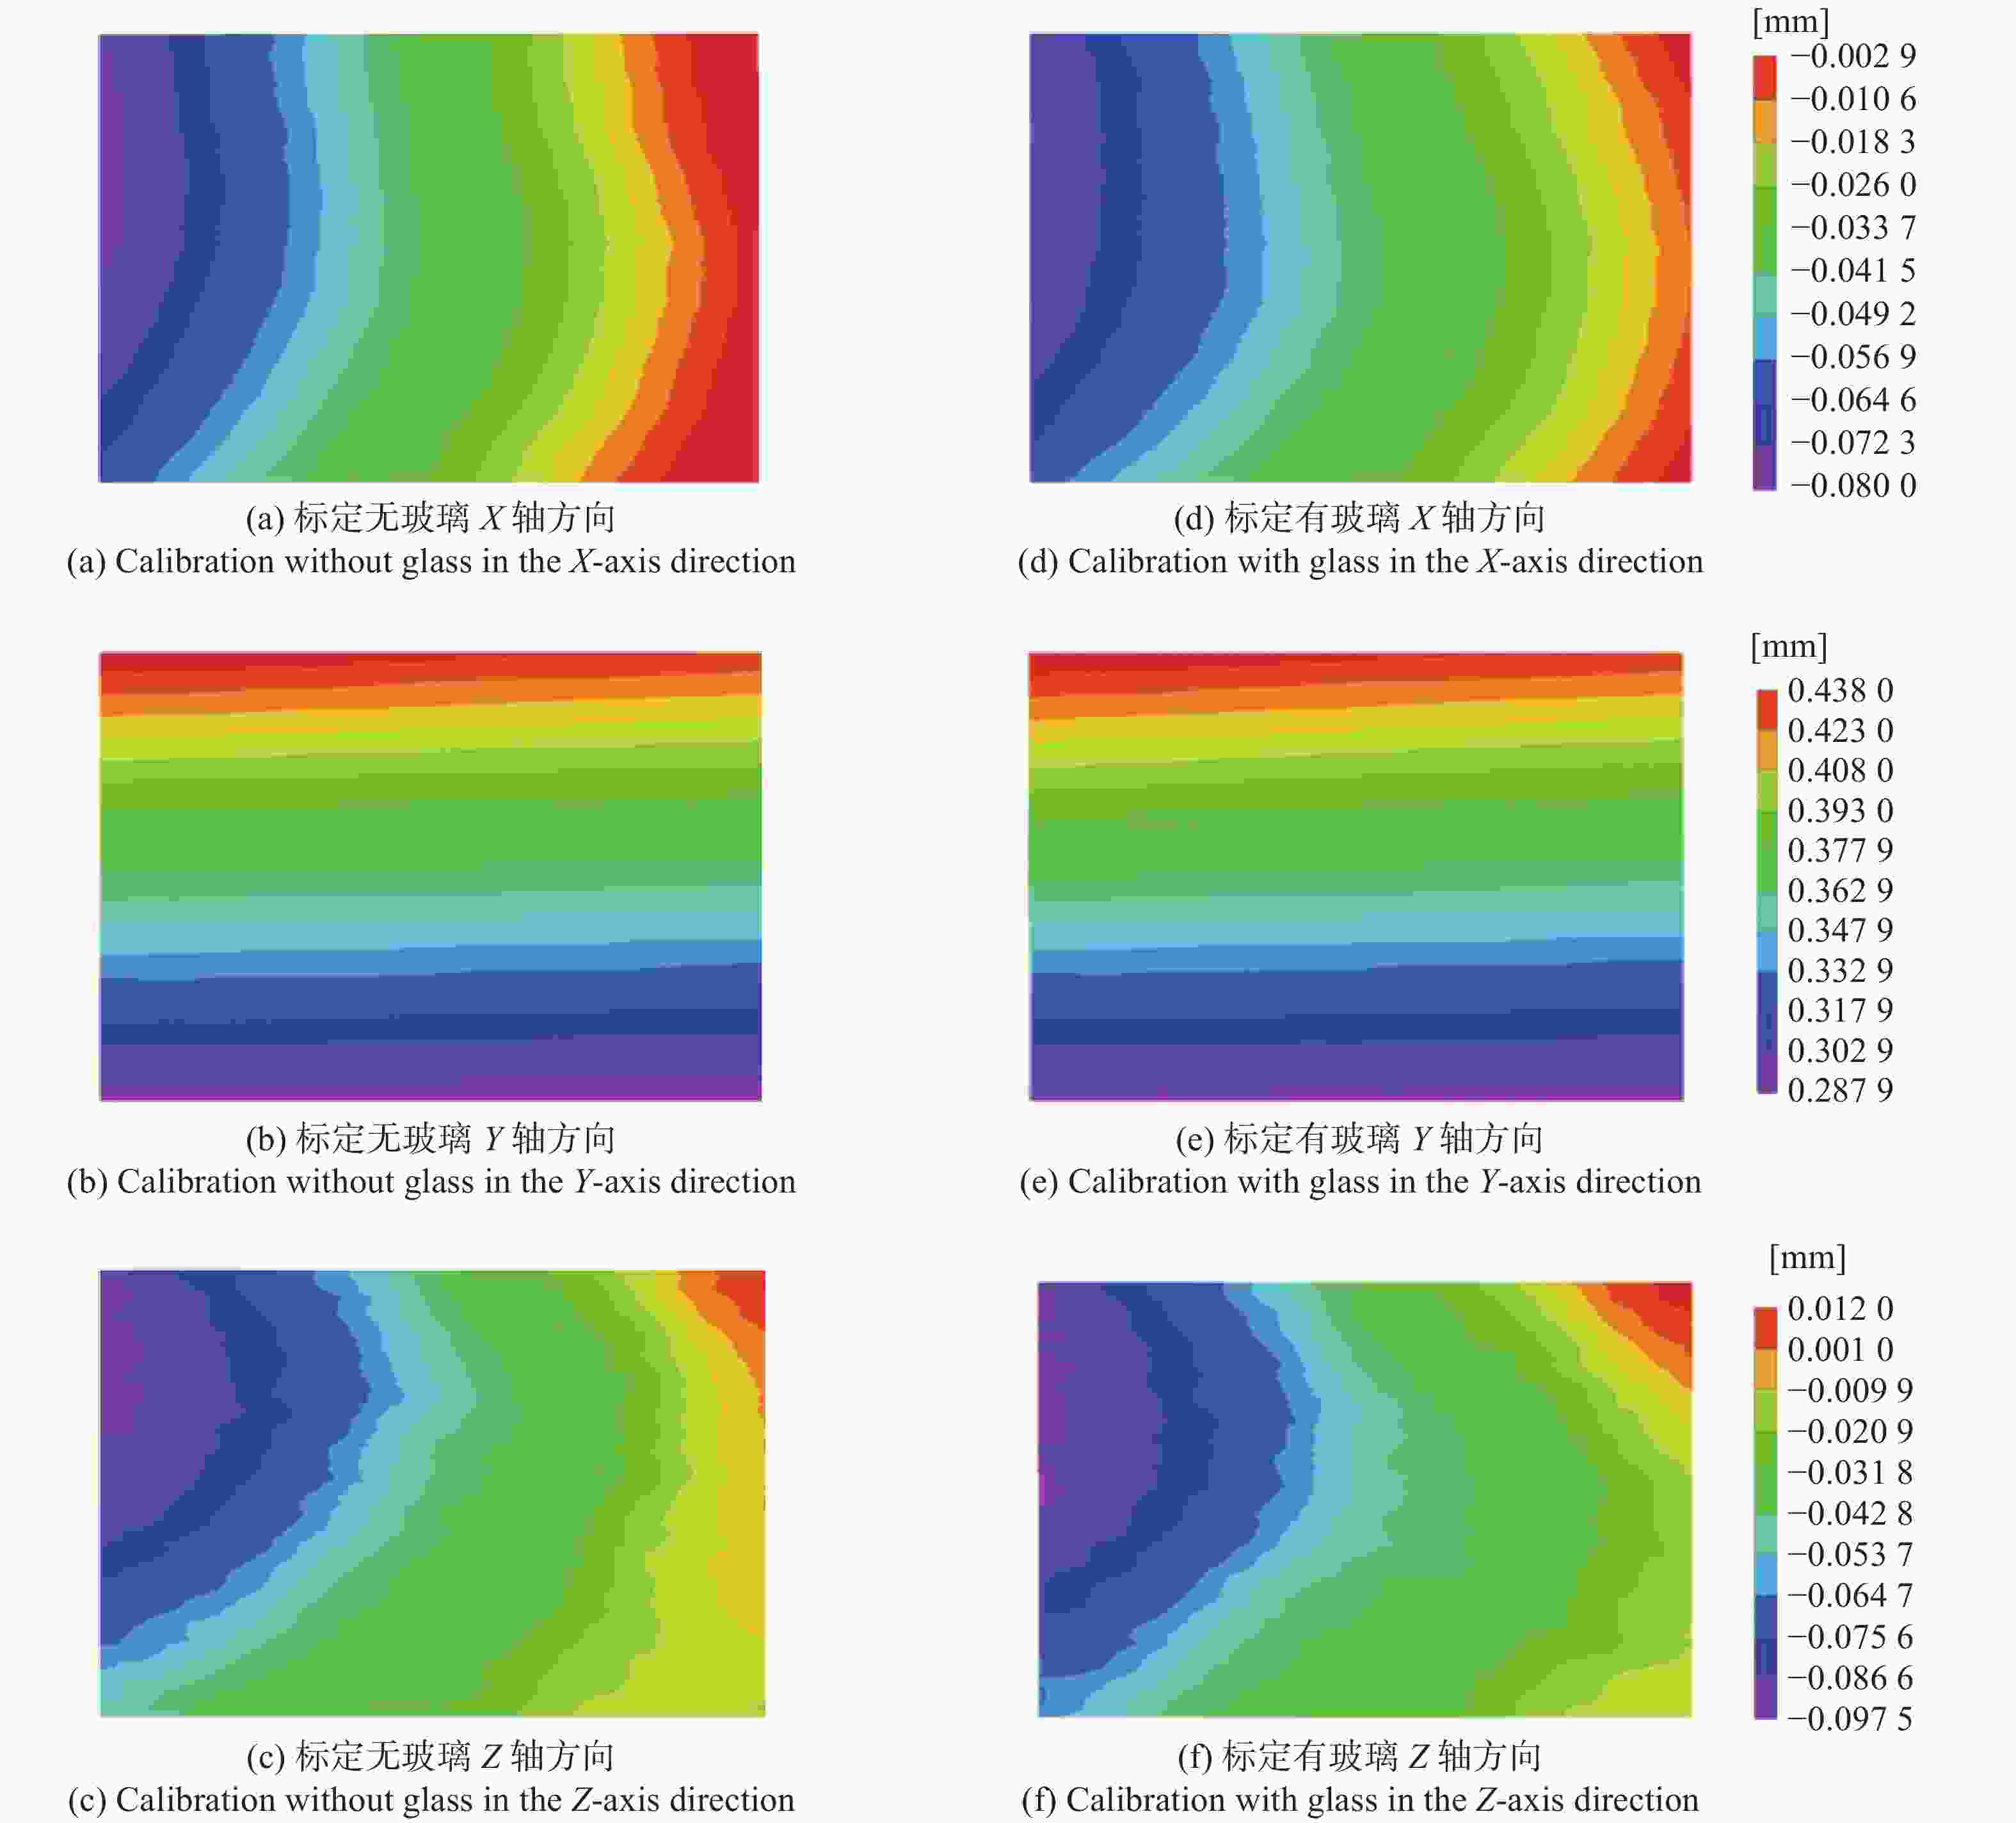
摘要: 为了校正玻璃介质在高温变形测量中引起的测量误差,本文将玻璃介质作为相机标定模型的一部分,基于摄影测量技术和数字图像相关法,提出一种复杂环境下的双目相机标定方法,将其应用在高温变形测量中。首先,针对复杂环境下图像质量差引起的标定困难问题,采用带畸变校正的相机成像模型,通过捆绑调整的相机标定方法完成双目相机标定,提高了标定成功率和稳定性。其次,针对复杂环境下双目相机标定精度低的问题,分析镜头焦距、环境光干扰和玻璃与相机距离等因素对标定结果的影响,给出最佳标定参数,使得标定重投影误差由0.832个像素减少到0.132个像素。最后,采用有玻璃介质的测量环境,比较标定时有无玻璃两种情况下的测量误差,结果表明:本文方法能大幅减少测量误差。试验结果表明,该方法能够有效减少高温环境下玻璃介质导致的位移场测量误差,X,Y和Z轴位移场平均测量误差分别减少70.16%,76.51%和40.05%。本文方法能够实现复杂环境下相机高精度标定,标定稳定性好,是实现高温变形准确测量的有效途径。Abstract: In order to correct the measurement error caused by a glass medium in high-temperature deformation measurement, we take a glass medium as a part of the camera calibration model. Based on photogrammetry technology and digital image correlation, a binocular camera calibration method in a complex environment is proposed and applied to high-temperature deformation measurements. Firstly, aiming at the calibration difficulty caused by the poor image quality in complex environments, the camera imaging model with distortion correction is adopted to achieve binocular camera calibration by bundle adjustment camera calibration method, which improves the success rate and stability of calibration. Secondly, to solve the problem of low calibration accuracy of binocular cameras in complex environments, the influence of lens focal length, ambient light interference and the distance between glass and camera on the calibration results are analyzed, and the optimal calibration parameters are given, so that the calibration reprojection error is reduced from 0.832 pixels to 0.132 pixels. Finally, the measurement error of the calibration method with and without glass is compared by using the measurement environment with a glass medium, which proves that this method can greatly reduce the measurement error. The test results show that this method can effectively reduce the measurement error of a displacement field caused by glass medium in a high-temperature environment. The maximum decrease of measurement error of the displacement field in the X, Y and Z axes is 70.16%, 76.51% and 40.05%, respectively. The method in this paper can achieve high-precision camera calibration in complex environments, and has good calibration stability. It is an effective way of realizing accurate measurement of high-temperature deformation.
-
表 1 不同焦距下的重投影误差
Table 1. The reprojection error at different focal lengths
焦距/mm 8 12 16 25 50 75 Sigma/pixel 0.024 0.030 0.039 0.024 0.040 0.048 -
[1] 郜魏柯, 杜小平, 王阳, 等. 散斑目标探测技术综述[J]. 中国光学,2020,13(6):1182-1193. doi: 10.37188/CO.2020-0049GAO W K, DU X P, WANG Y, et al. Review of laser speckle target detection technology[J]. Chinese Optics, 2020, 13(6): 1182-1193. (in Chinese) doi: 10.37188/CO.2020-0049 [2] 王永红, 张倩, 胡寅, 等. 显微条纹投影小视场三维表面成像技术综述[J]. 中国光学,2021,14(3):447-457. doi: 10.37188/CO.2020-0199WANG Y H, ZHANG Q, HU Y, et al. 3D small-field surface imaging based on microscopic fringe projection profilometry: a review[J]. Chinese Optics, 2021, 14(3): 447-457. (in Chinese) doi: 10.37188/CO.2020-0199 [3] 祝祥, 邵双运, 宋志军. 基于线结构光传感器的轨道板几何形貌检测方法[J]. 中国光学,2018,11(5):841-850. doi: 10.3788/co.20181105.0841ZHU X, SHAO SH Y, SONG ZH J. A detection method based on line-structured light sensor for geometrical morphology of track slab[J]. Chinese Optics, 2018, 11(5): 841-850. (in Chinese) doi: 10.3788/co.20181105.0841 [4] 乔美霞, 潘志伟, 黄生洪, 等. 真空环境下钨材料高温形变的数字相关测量技术研究[J]. 实验力学,2020,35(4):557-566. doi: 10.7520/1001-4888-19-066QIAO M X, PAN ZH W, HUANG SH H, et al. Investigation on digital image correlation measurement technique for high temperature deformation of tungsten materials in vacuum environment[J]. Journal of Experimental Mechanics, 2020, 35(4): 557-566. (in Chinese) doi: 10.7520/1001-4888-19-066 [5] MAO W G, WANG Y J, HUANG H Y, et al. In situ characterizations of mechanical behaviors of freestanding (Gd0.9Yb0.1)2Zr2O7 coatings by bending tests under different temperatures based on digital image correlation[J]. Journal of the European Ceramic Society, 2020, 40(2): 491-502. doi: 10.1016/j.jeurceramsoc.2019.07.031 [6] GRANT B M B, STONE H J, WITHERS P J, et al. High-temperature strain field measurement using digital image correlation[J]. The Journal of Strain Analysis for Engineering Design, 2009, 44(4): 263-271. doi: 10.1243/03093247JSA478 [7] HAMMER J T, SEIDT J D, GILAT A. Strain measurement at temperatures up to 800°C utilizing digital image correlation[M]//JIN H, SCIAMMARELLA C, YOSHIDA S, et al. . Advancement of Optical Methods in Experimental Mechanics, Volume 3. Cham: Springer, 2014: 167-170. [8] GUO X, LIANG J, TANG ZH Z, et al. High-temperature digital image correlation method for full-field deformation measurement captured with filters at 2600°C using spraying to form speckle patterns[J]. Optical Engineering, 2014, 53(6): 063101. doi: 10.1117/1.OE.53.6.063101 [9] SU Y Q, YAO X F, WANG SH, et al. Improvement on measurement accuracy of high-temperature DIC by grayscale-average technique[J]. Optics and Lasers in Engineering, 2015, 75: 10-16. doi: 10.1016/j.optlaseng.2015.06.003 [10] 段淇元, 宫文然, 郭保桥, 等. 高温数字图像相关方法中的制斑和图像处理技术[J]. 清华大学学报(自然科学版),2019,59(6):425-431.DUAN Q Y, GONG W R, GUO B Q, et al. Techniques of speckle fabrication and imgae processing for high temperature digital image correlation[J]. Journal of Tsinghua University (Science &Technology) , 2019, 59(6): 425-431. (in Chinese) [11] WANG H Q, ZHANG Q, GE P X, et al. Thermal radiation elimination method for high-temperature digital image correlation using polarization camera[J]. Measurement Science and Technology, 2021, 32(6): 065203. doi: 10.1088/1361-6501/abed87 [12] VALERI G, KOOHBOR B, KIDANE A, et al. Determining the tensile response of materials at high temperature using DIC and the virtual fields method[J]. Optics and Lasers in Engineering, 2017, 91: 53-61. doi: 10.1016/j.optlaseng.2016.11.004 [13] 胡悦, 王永红, 鲍思源, 等. 高温下数字图像相关散斑最优成像探究[J]. 中国光学,2018,11(5):728-735. doi: 10.3788/co.20181105.0728HU Y, WANG Y H, BAO S Y, et al. Optimal imaging of digital image correlation speckle under high temperature[J]. China Optics, 2018, 11(5): 728-735. (in Chinese) doi: 10.3788/co.20181105.0728 [14] LIU M, GUO J, HUI C Y, et al. Application of Digital Image Correlation (DIC) to the measurement of strain concentration of a PVA dual-crosslink hydrogel under large deformation[J]. Experimental Mechanics, 2019, 59(7): 1021-1032. doi: 10.1007/s11340-019-00520-4 [15] LYONS J S, LIU J, SUTTON M A. High-temperature deformation measurements using digital-image correlation[J]. Experimental Mechanics, 1996, 36(1): 64-70. doi: 10.1007/BF02328699 [16] SU Y Q, YAO X F, WANG SH, et al. Refraction error correction for deformation measurement by digital image correlation at elevated temperature[J]. Optical Engineering, 2017, 56(3): 034106. doi: 10.1117/1.OE.56.3.034106 [17] 施佳豪, 王庆, 冯悠扬. 基于三维标定板的相机标定方法[J]. 传感器与微系统,2021,40(6):48-51.SHI J H, WANG Q, FENG Y Y. Camera calibration method based on 3D calibration plate[J]. Transducer and Microsystem Technologies, 2021, 40(6): 48-51. (in Chinese) [18] 郑冬, 冯鹏, 龙邹荣, 等. 面向多因素工况下的相机标定精度综述[J]. 国外电子测量技术,2020,39(8):109-116.ZHENG D, FENG P, LONG Z R, et al. Summary of camera calibration accuracy for multi-factor operating conditions[J]. Foreign Electronic Measurement Technology, 2020, 39(8): 109-116. (in Chinese) [19] 支健辉, 董新民, 孔星炜, 等. 相机标定的外界影响因素分析[J]. 应用光学,2014,35(2):286-291.ZHI J H, DONG X M, KONG X W, et al. Analysis of external influence factors in camera calibration[J]. Journal of Applied Optics, 2014, 35(2): 286-291. (in Chinese) [20] VERBIEST F, PROESMANS M, VAN GOOL L. Modeling the effects of windshield refraction for camera calibration[C]. Proceedings of the 16th European Conference on Computer Vision. Glasgow: Springer, 2020: 397-412. [21] VALLÉE C, FORTUNÉ D, LERINTIU C. On the dual variable of the Cauchy stress tensor in isotropic finite hyperelasticity[J]. Comptes Rendus Mécanique, 2008, 336(11-12): 851-855. -


 下载:
下载:
